Did you know that “Happy Mew Year for Cats Day” is a real holiday? Created by Thomas and Ruth Roy, this whimsical day was designed to ensure our beloved feline friends get their own celebration alongside the humans.
But let’s be honest, for cat lovers, every day is cat day.
Many people divide the population into two distinct groups: “Cat People” and everyone else. Whether you are a devoted cat owner, or just someone who spends a little too much time watching funny kitten videos at work (we’ve all been there!), there is something undeniably comforting about a cute kitty.
Since children naturally gravitate towards animals, this DIY Felt Cat Plushie is the perfect project to introduce them to the world of sewing. It is soft, squishy, and infinitely customizable. Whether you turn it into a holiday ornament, a backpack charm, or a pocket-sized “worry pet,” this craft is sure to bring a smile to anyone’s face.
Below, we have compiled a comprehensive guide, including a material list, detailed stitching techniques, and customization ideas to make this project a success
Why Choose Felt for Kids’ Sewing Projects?
Before we thread our needles, let’s talk about materials. If you are a beginner or crafting with children, felt is the absolute best fabric to start with.
- No Fraying: Unlike cotton or satin, felt is a non-woven fabric. When you cut it, the edges stay crisp and clean. You don’t need to worry about hemming or using a serger.
- Forgiving Texture: Felt has a fuzzy texture that hides imperfect stitches. If a child’s hand is a little shaky, the felt blends the thread in, making the final product look polished regardless of skill level.
- Inexpensive & Accessible: You can find acrylic craft felt sheets at almost any dollar store or craft supply shop for pennies, making this a low-risk, high-reward activity.
The Essentials: List of Supplies
To make your felt cat plushie, gather the following items. We recommend setting everything up on a clean table to keep small pieces from getting lost.
- Felt Sheets:
- Main Body Color: Brown, Grey, Orange, or Black (depending on the cat breed you want).
- Accent Colors: White (for the muzzle/tummy), Pink (for ears/nose), and Black (for details).
- The Template: (You can draw a simple snowman-shape for the body and a separate oval for the head, or download a standard cat plushie template).
- Needle and Thread:
- An embroidery needle (has a larger eye, easier for kids to thread).
- Embroidery floss (use 2 strands for a delicate look, or all 6 strands for a chunky, visible stitch).
- Stuffing: Poly-fill fiber stuffing or scrap felt cut into tiny pieces.
- Scissors: Sharp fabric scissors for clean cuts.
- Marking Tool: A pencil or a disappearing fabric marker.
- Optional: A chopstick or pencil (to help push stuffing into the tail).
Step-by-Step Tutorial: How to Make Your Cat Plushie
This project is “beginner-friendly,” but it does involve small pieces. If you are working with children under the age of 8, we recommend an adult handles the cutting while the child helps with the design and stuffing.
Phase 1: Preparation
1. Prepare the Pattern: Download your template or hand-draw your shapes. You will need:
- 1 Main Body Base (Peanut shape)
- 1 Head Shape (Oval with ears)
- 1 Half-Body/Tummy (Semi-circle)
- 1 Tail piece
- Tiny accessories: Inner ears, nose, eyes, fur patches.
2. Trace and Cut: Place your paper pattern pieces onto the felt. Pro Tip: Use a piece of clear tape to hold the paper onto the felt while you cut. This prevents the paper from sliding around, which is much easier than using pins on small pieces.
Phase 2: Assembling the Face (The Personality)
The face is what brings your plushie to life!
3. The Eyes and Mouth: Before you sew the head to the body, you must decorate the face.
- Eyes: You can stitch small black circles of felt, or for a simpler method, use a “French Knot” with thick black thread.
- Sparkle: Add a tiny single stitch of white thread inside the black eye to give it a “twinkle.” This makes the cat look awake and happy.
- Mouth: Use a back-stitch to create the “W” shape for the mouth.
- Nose: Glue or stitch the tiny pink triangle nose right above the mouth.
4. The Ears: Stitch or use a tiny dot of fabric glue to attach the pink inner-ear pieces to the main head piece.
Phase 3: Layering the Body
This is where the magic happens. We are going to build the cat from the bottom up.
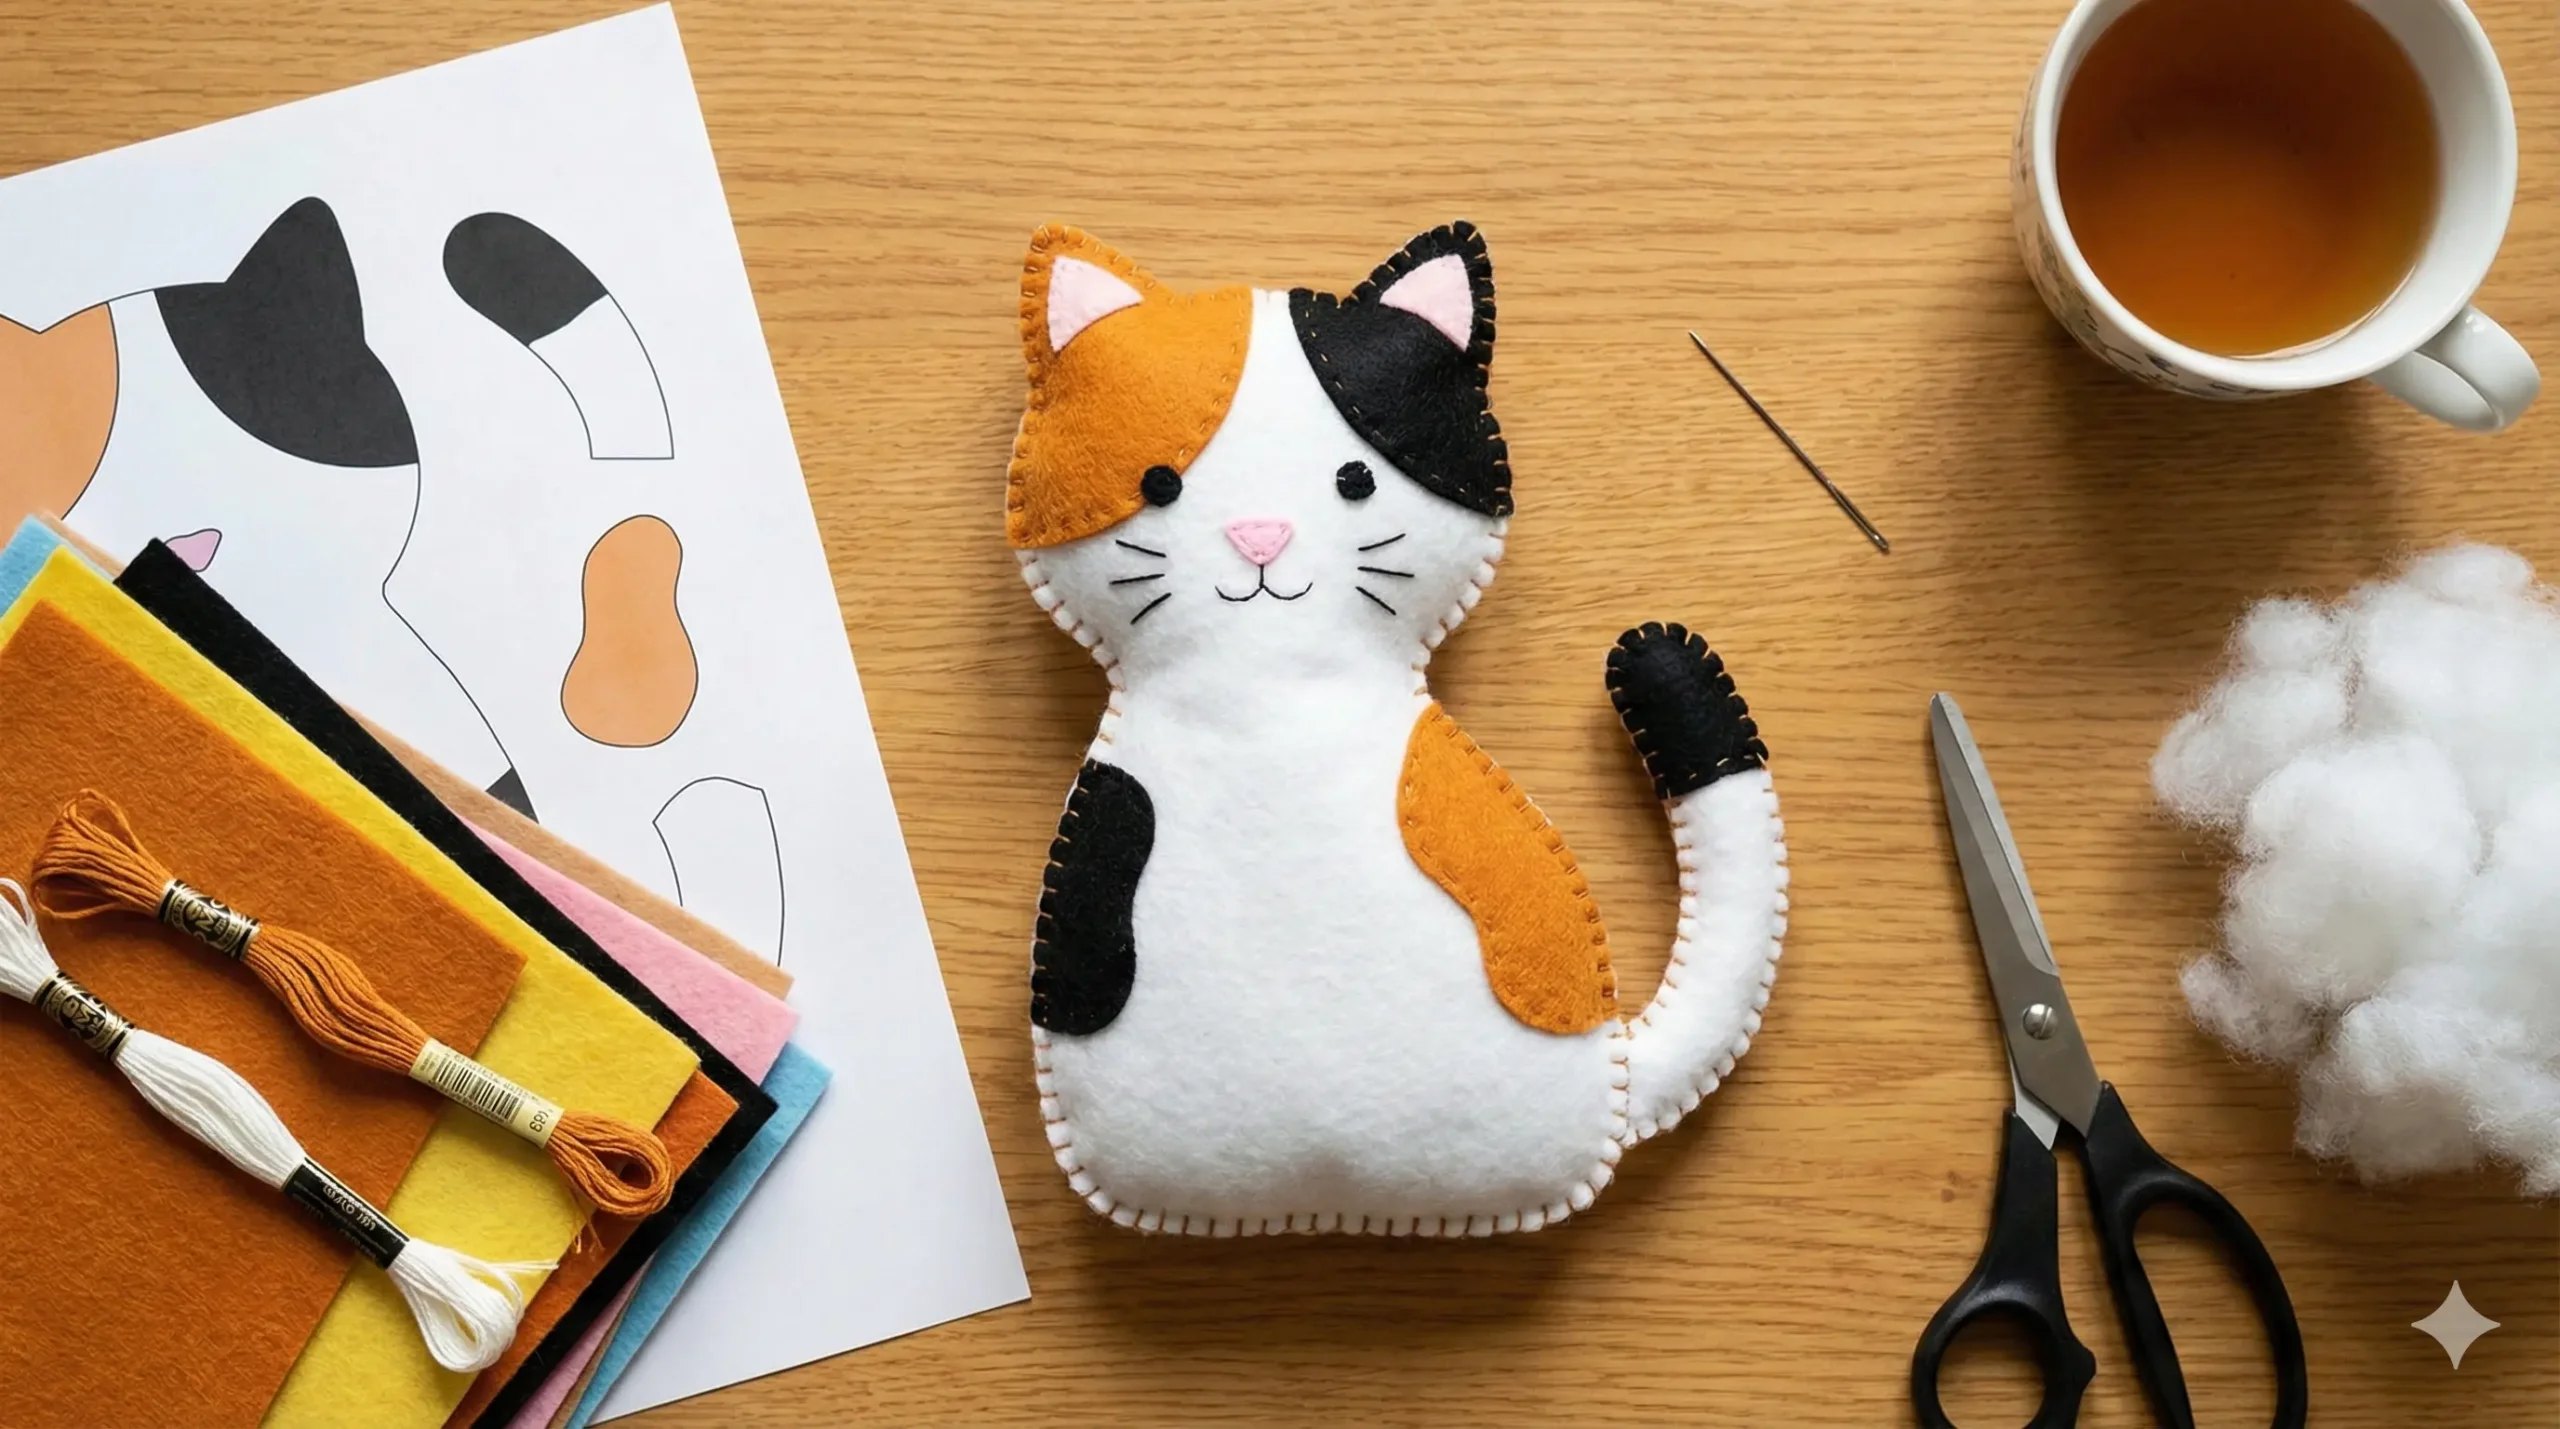
5. The Tail Assembly: Take your tail piece. If you want a 3D tail, cut two pieces, stitch them together, and lightly stuff them. If you want a flat tail (easier for beginners), just use one thick piece of felt. Stitch a small white “tip” to the end of the tail for detail.
6. The “Sandwich” Method: Place your Base Body Pattern flat on the table.
- Lay the Tail on the base (position it so it sticks out the side).
- Lay the Half-Body (Tummy) piece on the bottom of the base.
- Lay the Head piece on the top, slightly overlapping the tummy piece.
Check point: Does it look like a cat? If yes, pin it in place!
Phase 4: Stitching and Stuffing
7. The Blanket Stitch: The best stitch for felt plushies is the Blanket Stitch. This wraps the thread around the edge of the fabric, securing it and decorating it at the same time. If this is too hard for a child, a simple Running Stitch (up and down) works perfectly fine too.
8. Sewing the Perimeter: Start stitching around the outer edge of the cat, joining the top layers to the bottom base layer.
- Important: Do not sew it completely shut yet! Stop when you have about 2 inches left open (usually at the bottom or side).
9. Stuffing Time: Take your poly-fill stuffing. Pull it apart to fluff it up (this prevents lumpy cats). Push small amounts into the hole. Use a chopstick to push the stuffing all the way up into the ears and the head.
- Tip: Don’t overstuff! If the cat looks like it’s about to explode, the stitches will show gaps. It should be squishy, not rock-hard.
10. Closing Up: Once stuffed, continue your stitch to close the hole. Knot the thread securely at the back, pass the needle through the body one last time, and snip the excess thread so the tail disappears inside the plushie.
5 Creative Ways to Customize Your Cat
Once you have mastered the basic pattern, try these variations to make a whole litter of kittens!
- The Tuxedo Cat: Use black felt for the body and white felt for the tummy and face markings to create a classic “Felix” look.
- The Calico: Use a white base and sew on random organic shapes of orange and black felt before assembling the body.
- Scented Sachet: Mix a tablespoon of dried lavender with your stuffing. Now your plushie doubles as a calming drawer sachet or a sleep buddy.
- Keychains & Ornaments: Before you sew the head shut, insert a loop of ribbon at the very top. Stitch through the ribbon to secure it. Now you can hang it on a Christmas tree or a school bag.
- The “Grumpy” Cat: Change the expression! Instead of a “W” mouth, sew a straight line or a frown, and angle the eyebrows down to make a hilarious grumpy cat.
Frequently Asked Questions (FAQ)
Q: Can I use glue instead of sewing? A: Yes! If you want a “no-sew” project, you can use strong fabric glue or a hot glue gun. However, the plushie won’t be as durable, and you won’t be able to stuff it as full. For a 3D plushie, sewing is always best.
Q: Is this craft suitable for boys? A: Absolutely. Crafts have no gender. To make it more appealing to different interests, try making a “Super Hero Cat” with a felt cape, or a “Tiger” using orange felt with black stripes.
Q: How do I wash the plushie? A: Felt can shrink if washed in hot water. If the kitty gets dirty, spot clean it with a damp cloth and mild soap. Do not put it in the washing machine.
Conclusion
In a world dominated by screens and plastic toys, creating a DIY Felt Cat Plushie offers a refreshing break. It is a tactile, creative experience that results in a tangible reward.