Is there a sight more heartwarming than a child curled up with a good book, completely lost in a story? In a digital world where screens compete for every second of our attention, seeing a child develop a love for reading is a victory for parents and teachers alike.
However, building a consistent reading habit can be tricky. Kids often lose their place, get frustrated, or simply lose interest if the experience doesn’t feel “fun.” This is where the magic of DIY corner bookmarks comes in.
These aren’t just place-markers; they are little companions that live on the corners of pages, waiting to greet your child every time they open their book. From teeth-baring sharks to fluttering butterflies, these crafts double as a fine motor skill activity and a reading incentive.
Below, we explore why these crafts matter, how to make the “perfect base,” and 25 unique design ideas to keep your little readers engaged all year round.
Why DIY Bookmarks Are More Than Just Crafts
Before we dive into the glue and glitter, it is important to understand why this specific craft is so valuable for child development.
- Boosting Fine Motor Skills: The process of folding paper (Origami) requires precision. Creasing, folding, and cutting small decorative pieces helps strengthen the small muscles in a child’s hands, which is essential for handwriting.
- Reading Ownership: When a child makes their own bookmark, they feel a sense of ownership over their reading experience. It creates a positive psychological association between “fun crafting” and “reading time.”
- Encouraging Mindfulness: Origami requires focus and patience. It is a quiet, calming activity that can help settle a child before a reading session.
The Master Class: How to Make the Basic Bookmark Base
Every bookmark on our list starts with the same simple “Origami Corner” base. Once you master this, you can create anything!
What You Need:
- A square piece of paper (6×6 inches is standard, but 4×4 works for smaller books).
- Scissors and a glue stick.
- Colored construction paper for decoration.
Step-by-Step Instructions:
- The Triangle Fold: Place your square paper flat like a diamond. Fold the bottom corner up to meet the top corner, creating a triangle.
- The Guide Folds: Take the bottom left corner of the triangle and fold it up to the top point. Do the same with the bottom right corner. You should briefly see a smaller diamond shape. Now, unfold both of these so you are back to the large triangle.
- The Pocket: Take the top layer only of the top corner of the triangle and fold it downwards to touch the bottom edge. This creates a little “pocket” opening.
- ** The Tuck:** Take the right corner again, fold it up, but this time tuck it inside the pocket you just made. Repeat with the left corner.
- Flatten: Press everything down firmly. You now have a perfect square pocket that fits over a page corner!
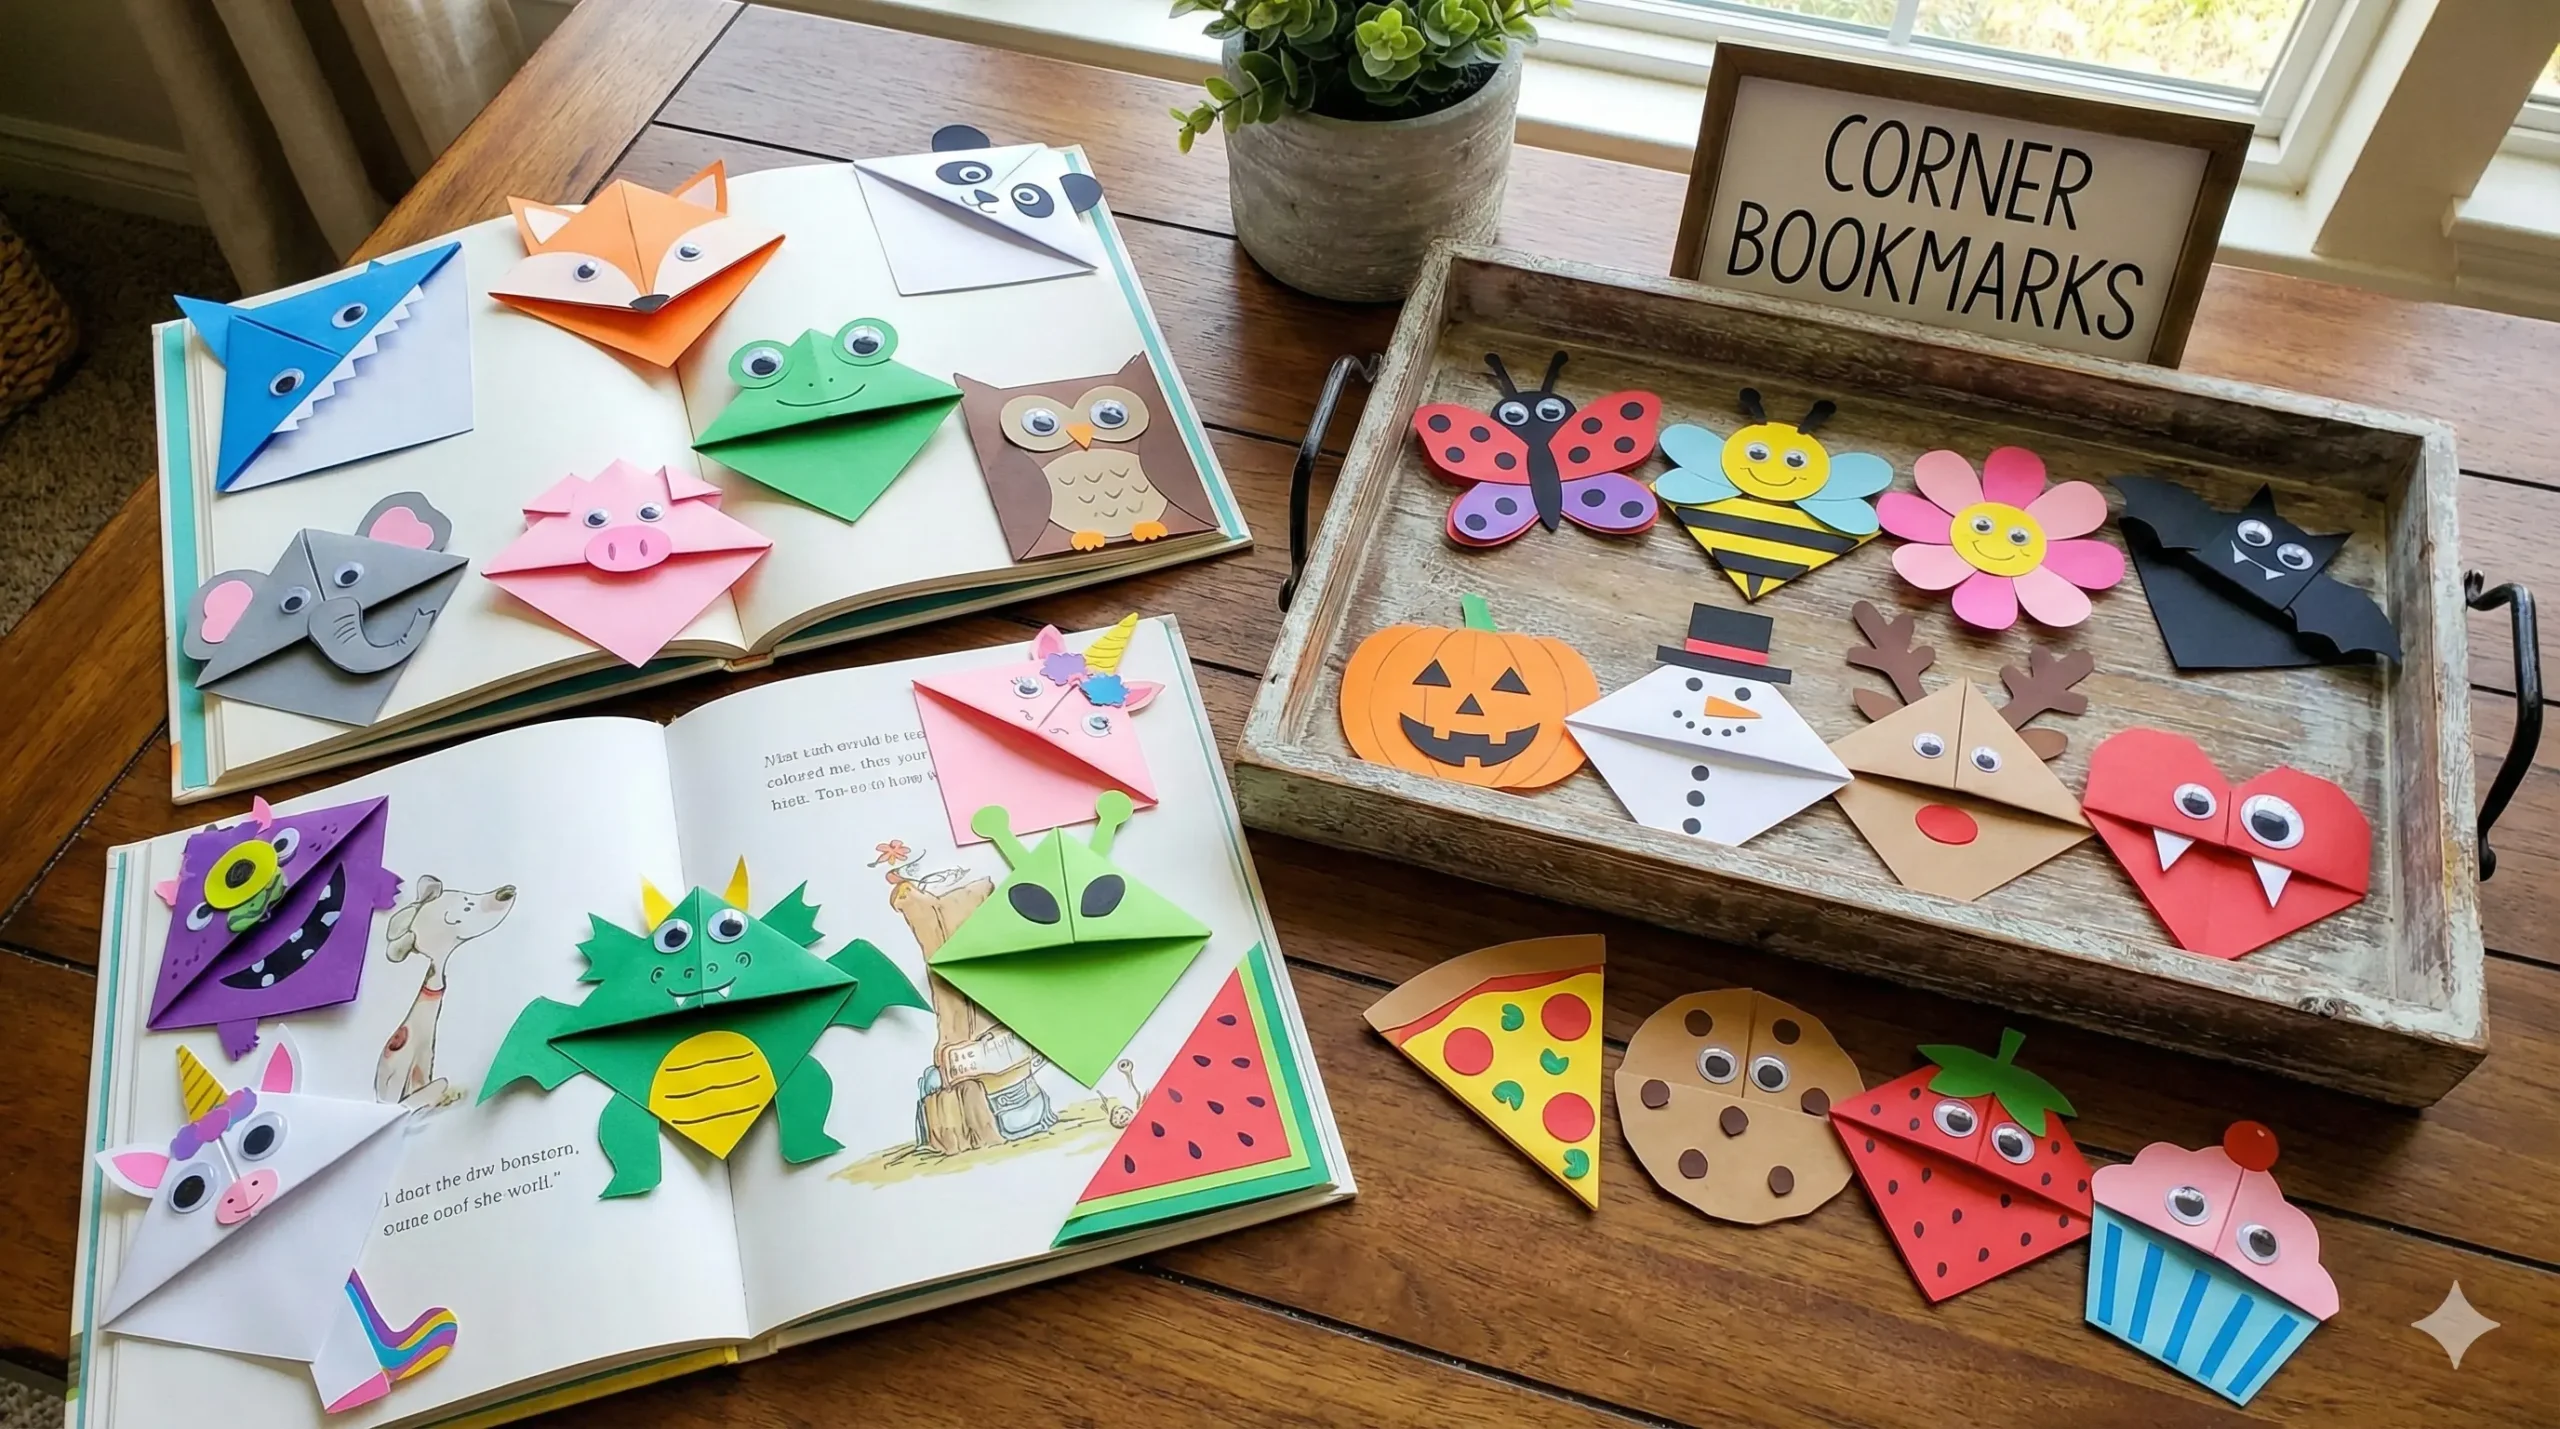
25 Creative Themes for Every Reader
Now that you have your base, it’s time to transform it! We have categorized these into themes to help you find the perfect match for your child’s interests.
🦁 The Animal Kingdom
These designs are perfect for kids who love nature and zoo visits.
1. The Chomp-Chomp Shark Use blue paper for the base. Cut a zigzag pattern out of white paper for “teeth” and glue them to the inside of the pocket mouth. Add a dorsal fin to the side and googly eyes. This is a favorite for adventure books!
2. The Clever Fox Use orange paper. Glue two orange triangles (with white centers) to the top for ears. Add a white heart shape to the bottom point for the muzzle, and a small black nose.
3. The Sleepy Panda Start with a white base. Glue two black circles for ears and two large black ovals for the eye patches. Draw a tiny mouth. This monochrome look is stylish and cute.
4. The Hopping Frog Use green paper. The key here is the eyes—cut two semi-circles of green paper and glue them to stick up from the top edge. Add large white eyes inside them. Don’t forget a long red tongue!
5. The Wise Owl Use brown or grey paper. Cut large circles for eyes and a small orange triangle for the beak. Cut “feather” shapes from a lighter brown and glue them onto the main body for texture.
6. The Gentle Elephant Use grey paper. Cut a long trunk shape and glue it to the center. Add two large, floppy ear shapes to the sides of the bookmark.
7. The Pink Piggy Use bright pink paper. The nose is crucial here—cut a pink oval and draw two nostrils on it. Glue it to the center. Add triangular ears that flop slightly forward.
🍃 Garden & Nature
Perfect for spring reading or outdoor storytime.
8. The Ladybug Use red paper for the base. Cut large black circles (dots) and glue them all over. Use black paper to create a head at the top corner with antennae.
9. The Fluttering Butterfly Any color base works! The trick is to cut large, symmetrical wing shapes and glue them to the back of the bookmark so they stick out the sides. It looks like a butterfly has landed on your book.
10. The Busy Bee Use yellow paper. Draw horizontal black stripes across the body. Add wings made of vellum or white paper, and two little black antennae.
11. The Happy Flower Use green for the base (representing the stem/leaves). Glue colorful petals (cut from pink, purple, or yellow paper) around the top corner of the bookmark.
🎃 Seasonal & Holiday
Keep the reading habit going through the holidays.
12. The Spooky Bat (Halloween) Use black paper. Cut “bat wing” shapes and glue them to the sides. Add two small white fangs pointing down from the pocket opening.
13. The Jack-O-Lantern (Halloween) Use orange paper. Draw or cut out black shapes for the triangle eyes and a jagged grin. A small green rectangle at the top makes the stem.
14. The Snowman (Winter) Use white paper. Draw a carrot nose and a coal smile. You can even cut a small “hat” out of construction paper and glue it to the top corner.
15. The Reindeer (Christmas) Use brown paper. Trace the child’s hands on dark brown paper to make “antlers” and glue them to the back. Add a big red nose for Rudolph!
16. The Valentine Heart Use pink or red paper. Instead of a square top, use scissors to round off the top two points of the bookmark into curves, turning the whole shape into a heart.
👾 Monsters & Fantasy
For the readers who love fairy tales and sci-fi.
17. The One-Eyed Monster Use neon green or purple paper. Glue one massive white circle in the center for an eye. Add silly teeth and maybe some yarn hair on top.
18. The Magical Unicorn Use white or pastel paper. Twist a small piece of gold paper into a horn and glue it to the top. Add multicolored yarn or paper strips for a mane.
19. The Friendly Dragon Use green or red paper. Add “spikes” (small triangles) running down the side of the bookmark. Add a little puff of orange tissue paper coming out of the mouth for fire!
20. The Alien Use lime green paper. Give it three eyes and two antennae with pom-poms on the ends.
🍩 Foodie Favorites
Warning: These might make you hungry!
21. The Watermelon Slice Use red paper for the base. Glue a strip of green paper along the bottom edge (the rind). Draw black “seeds” all over the red part.
22. The Pepperoni Pizza Use yellow or beige paper. Glue a red wavy line near the top for sauce, and add red circles for pepperoni.
23. The Chocolate Chip Cookie Use light brown paper. Round off the edges so it isn’t so pointy. Draw irregular dark brown spots for chocolate chips.
24. The Cool Strawberry Use red paper. Add green leaves at the top point. Draw tiny yellow seeds. You can even give the strawberry sunglasses for a “cool” summer vibe.
25. The Cupcake Use a tan base for the “wrapper.” Glue a colorful, cloud-shaped piece of paper on top for the frosting and add a red pom-pom cherry.
Tips for Success
To ensure your bookmarks last through many library visits, keep these tips in mind:
- Paper Choice Matters: Standard origami paper is best because it folds easily without tearing. Cardstock is durable but hard for small hands to crease sharply.
- Less Glue is More: When adding decorations, use a glue stick rather than liquid glue. Liquid glue can make the paper wrinkly and soggy, which might damage book pages.
- Lamination: If you want the bookmark to last forever, you can cover the finished design in clear packing tape. This creates a faux-laminated effect that wipes clean.
Conclusion: Turning Pages, Creating Memories
The beauty of these 25 corner bookmarks is that they are inexpensive, require minimal supplies, and offer maximum engagement. They transform the solitary act of reading into a shared creative experience.
So, the next time you hear “I’m bored” or struggle to get your child to open a book, grab some paper. Ask them, “Do you want to make a shark that eats your page?” Watch their eyes light up, and watch the reading habit take flight.