There is something incredibly satisfying about crunching up a piece of paper. The sound, the texture, and the motion are all sensory delights for young children. If you are looking for a craft that combines sensory play, fine motor skill development, and an adorable farm animal theme, you have come to the right place.
Today, we are making a Crumpled Paper Sheep Craft.
Whether you are a fan of famous animated sheep like Shaun who get into hilarious trouble on the farm, or you are simply looking for a spring-themed activity or an Easter craft, this project is perfect. It is low-mess, uses materials you likely already have at home, and the result is a textured, fluffy 3D art piece that looks fantastic on the fridge.
Why This Craft is Perfect for Preschoolers
Before we dive into the glue and scissors, let’s talk about why this specific craft is a powerhouse for early childhood development.
1. Fine Motor Strength
The act of taking a flat square of tissue paper and squeezing it into a tight ball using the thumb, index, and middle fingers is excellent for building hand strength. This “pincer grasp” is the exact same muscle movement children need to learn how to hold a pencil, zip up a jacket, or tie their shoelaces.
2. Sensory Processing
Tissue paper has a unique feel—it’s smooth yet crinkly. The sound of crumpling provides auditory feedback, and the sticky texture of the glue adds a tactile element.
3. Patience and Focus
Covering the entire body of the sheep with paper balls requires a bit of patience. It teaches children to work towards a goal and fills them with pride when they see the finished “fluffy” result.
Supplies You Will Need
One of the best things about this craft is its simplicity. You don’t need fancy art supplies.
- Colored Craft Paper/Cardstock: You will need grey, black, or cream for the sheep’s head and legs. You will also need a bright color (like blue, green, or pink) for the background if you plan to mount the sheep.
- White Craft Tissue Paper: This is the star of the show. If you don’t have tissue paper, you can use thin crepe paper, or even white napkins separated into single layers.
- Pencil: For tracing shapes.
- Scissors: A kid-safe pair for the little ones and a sharper pair for adults.
- Craft Glue: Liquid white school glue (PVA) works best for this, but a strong glue stick can also work.
- Markers/Sharpies: Black for the eyes (or you can use Googly Eyes!) and pink for detailing the ears.
- Optional: A printable sheep template (if you have one) or you can easily draw the simple shapes freehand.
Step-by-Step Instructions
Follow this guide to create your own flock of fluffy sheep.
Step 1: Prepare Your Sheep Parts
If you are using a template, print it out on cardstock. If you are drawing freehand (which is very easy!), here is what you need to draw on your colored construction paper (grey or skin tone works well):
- The Head: Draw a pear shape or an oval.
- The Ears: Draw two teardrop shapes.
- The Legs: Draw two long, thin rectangles.
- The Hair: Draw a small cloud shape (this will go on top of the head).
- The Body: Draw a large oval or cloud shape on white cardstock or stiff paper. This will be the base we glue the tissue paper onto.
Step 2: Cut Out the Shapes
Have your child cut out the large body shape. This is great scissor practice! The legs and ears might be a bit tricky for very small hands, so an adult can assist here. Once all your pieces are cut, lay them out on the table.
Step 3: The “Crumple Zone”
This is the most important (and fun) step!
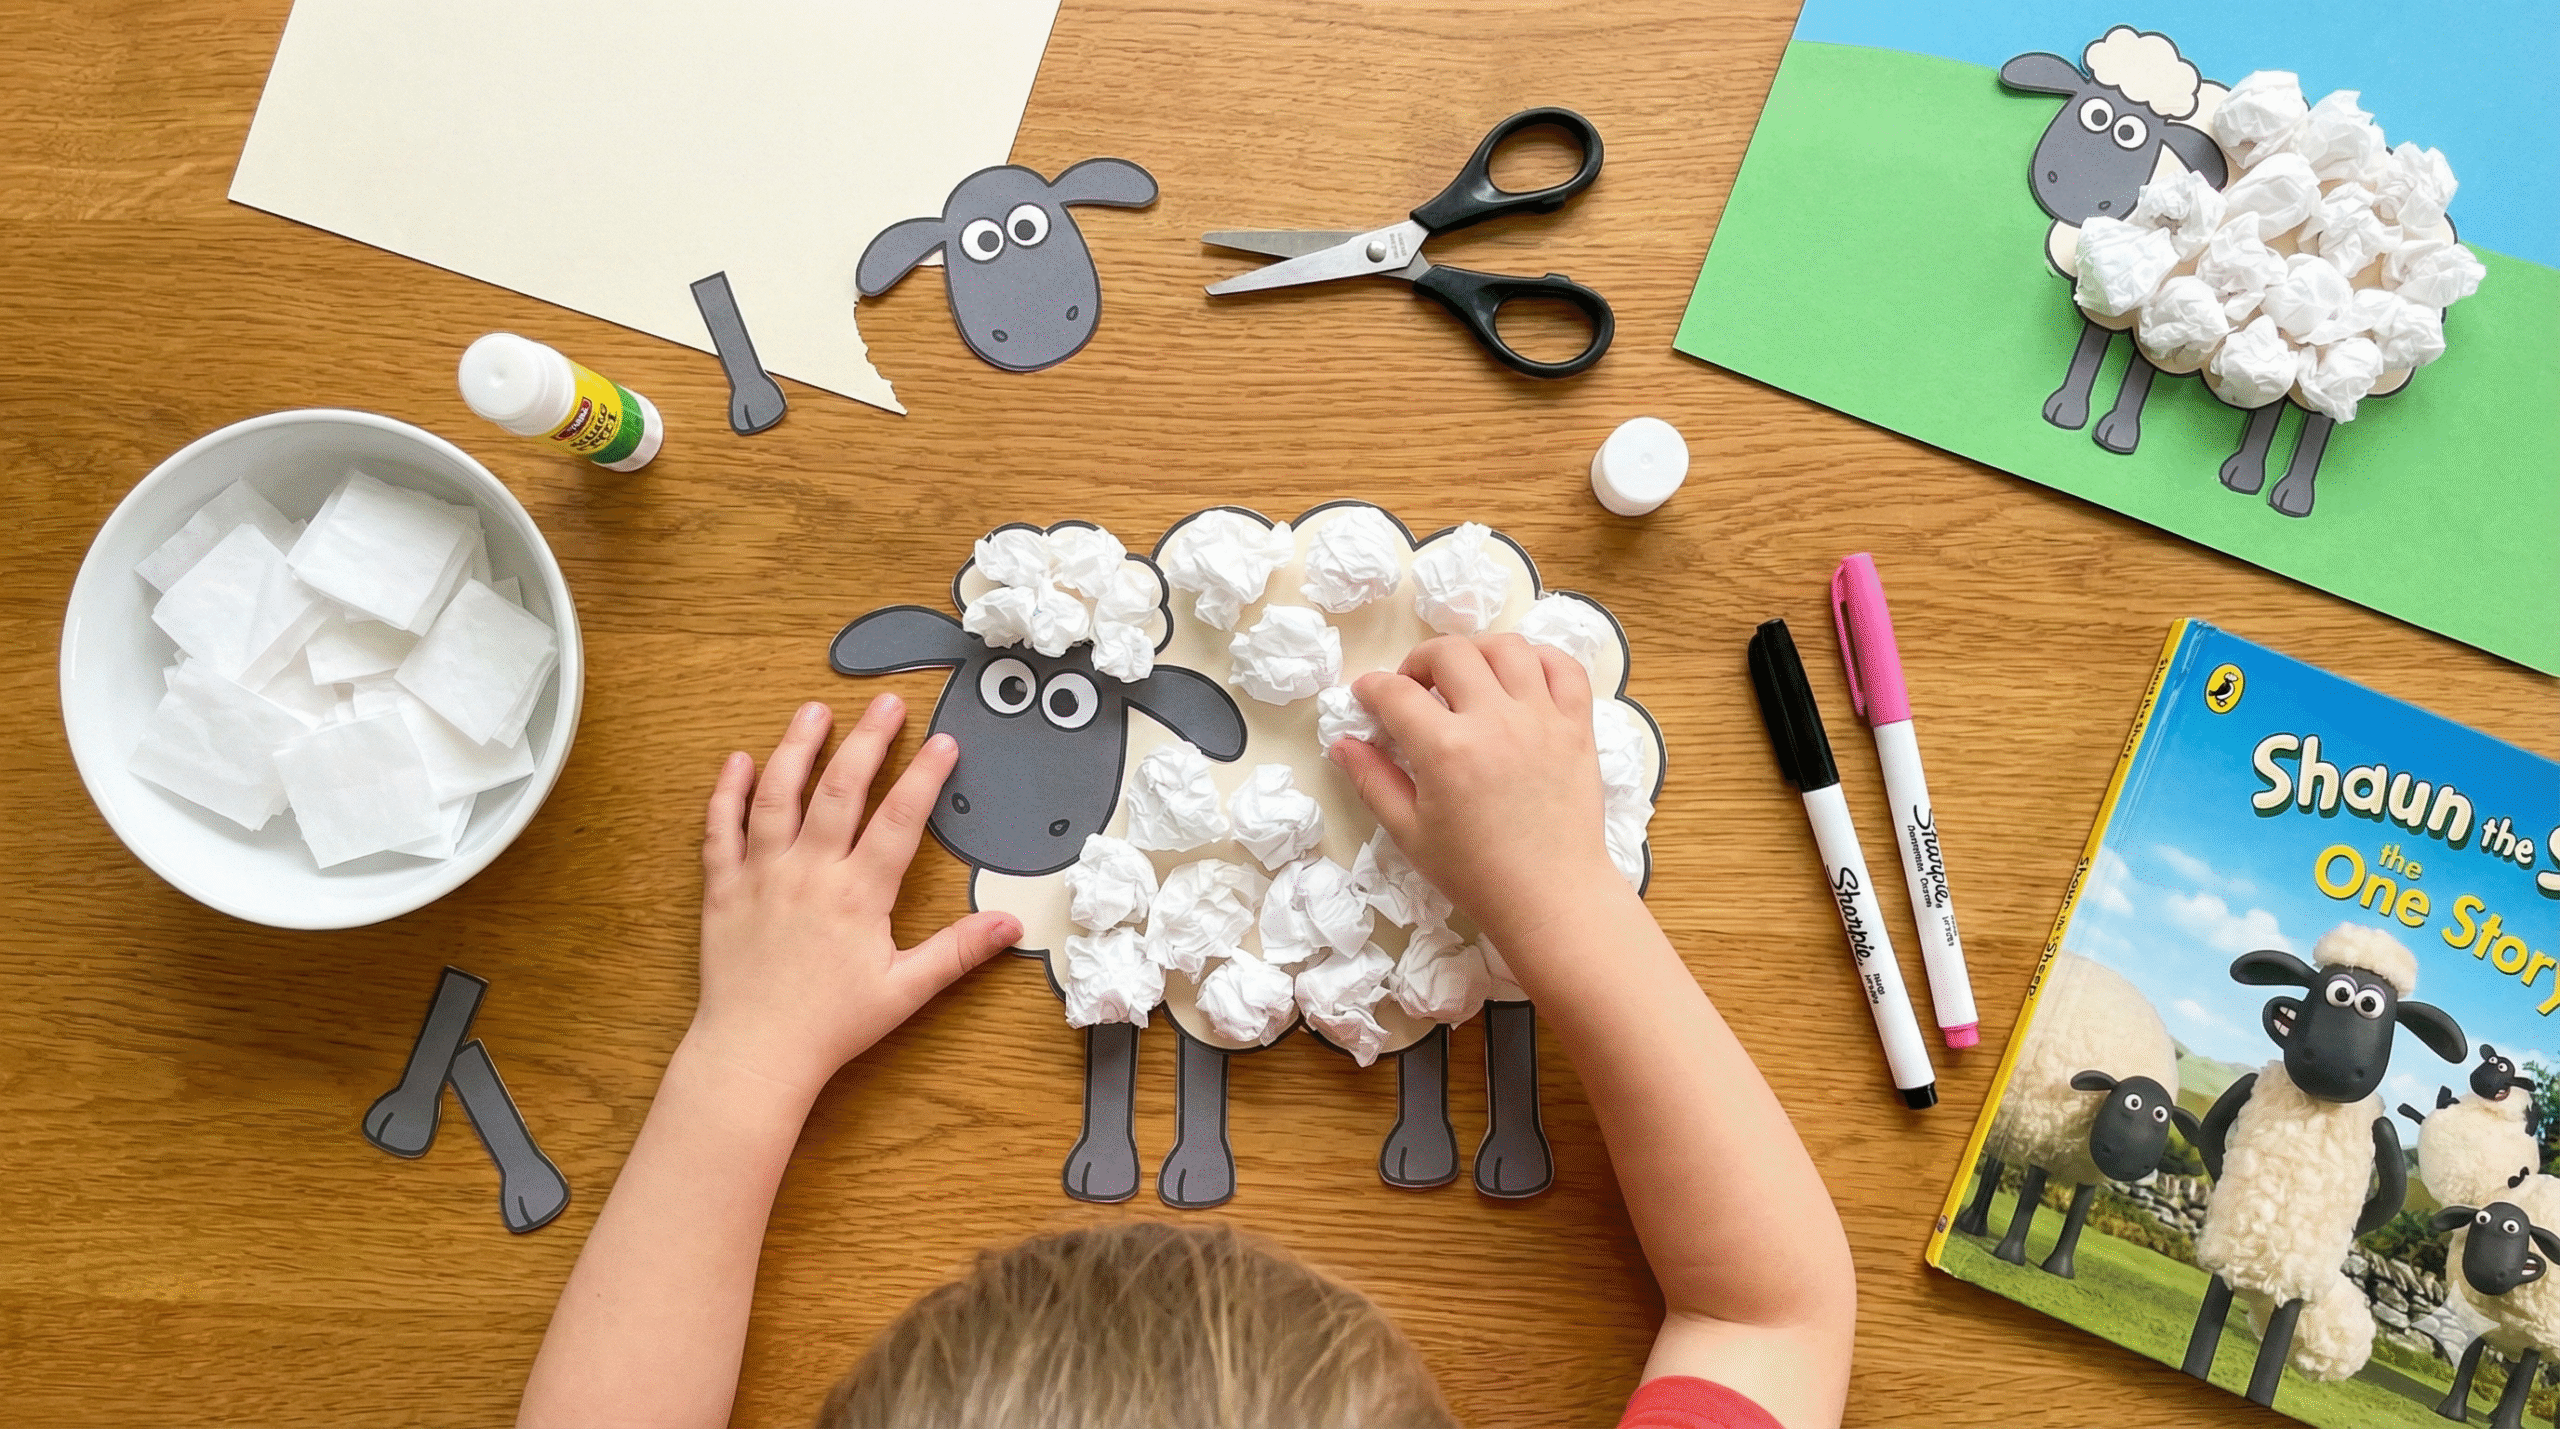
- Take your white tissue paper and cut it into squares. They don’t need to be perfect. Squares that are roughly 2 inches by 2 inches are the ideal size.
- You will need a lot of them—at least 30 to 40 squares depending on how big your sheep is.
- Demonstrate to your child how to place the square in their palm and use their fingers to scrunch it into a tight ball.
- Pro Tip: Make a game out of it! See who can make the smallest ball, or race to see who can make 10 balls the fastest.
Step 4: Assemble the Face
Before we get to the sticky glue part, let’s assemble the sheep’s face.
- Glue the two teardrop ears to the side of the head.
- If you have the small “cloud” shape for the hair, glue that to the top of the head. You can also glue a few crumpled tissue balls here later for a 3D effect.
- Draw the eyes with a black marker. To make it extra cute, make the eyes look in different directions or give the sheep glasses! Alternatively, stick on two plastic googly eyes for extra personality.
- Set the head aside to dry.
Step 5: Applying the Wool
Now, bring back the large oval body piece.
- Apply a generous layer of liquid glue to a small section of the sheep’s body. Don’t cover the whole thing at once, or the glue might dry before you get to it.
- Start sticking the crumpled white tissue balls onto the glue. Press them down firmly.
- Try to keep the balls close together so there are no gaps. We want a sheep that looks ready for winter, not one that has been sheared!
- Continue applying glue and paper balls until the entire body is covered in fluffy white texture.
Step 6: Final Assembly
Once the body is fully covered in “wool” and the glue has set slightly:
- Flip the body over and glue the two legs to the bottom of the oval.
- Glue the finished head onto the front of the body (right on top of the tissue paper). You might need a generous dollop of glue here to make sure the cardstock sticks to the uneven tissue paper surface.
- Optional: If the sheep looks lonely, glue the finished craft onto a piece of green construction paper. You can have your child draw grass, a sun, or a fence to complete the farm scene.
Variations to Spark Creativity
The classic white sheep is adorable, but art is about imagination! Here are a few ways to switch up this craft:
- Baa Baa Black Sheep: Use black tissue paper instead of white to create the star of the famous nursery rhyme.
- Rainbow Sheep: Who says sheep have to be realistic? Use multi-colored tissue paper squares to make a psychedelic rainbow sheep.
- Cotton Ball Swap: If you don’t have tissue paper, you can use cotton balls. The technique is the same, and the result is even softer!
- The “Shaun” Look: To make it look more like the famous TV character, make the legs extra long and skinny using black paper, and make the eyes very large and close together.
Educational “Sheep Talk” While You Craft
While your hands are busy crumpling and gluing, take the opportunity to teach your kids a little bit about farm life. Here are some fun facts to share:
- What is a baby sheep called? A lamb. A female sheep is a ewe, and a male is a ram.
- Why do we shear sheep? Just like we get a haircut, sheep need their wool cut off in the summer so they don’t get too hot. It doesn’t hurt them!
- What do sheep eat? Sheep are herbivores, which means they only eat plants. They love grass, clover, and hay.
- Sheep have square pupils! Ask your child to look at their own eyes in a mirror (round pupils) and tell them that sheep have rectangular pupils. This helps them see all around them to watch out for wolves.
Common Questions (FAQ)
Q: Can I use regular printer paper instead of tissue paper? A: You can, but it is much harder for small children to crumple tightly. Regular paper is stiff and might hurt little fingers after a while. Tissue paper, crepe paper, or even soft paper napkins work best.
Q: What if I don’t have googly eyes? A: No problem! You can draw eyes on white paper, cut them out, and glue them on. Or simply use a black marker to draw two dots.
Q: Is this craft suitable for toddlers? A: Yes! For toddlers (under 3), you will need to do the cutting. They will excel at the crumpling and sticking part. Just be sure to supervise so they don’t eat the paper or glue.
Conclusion
This Crumpled Paper Sheep Craft is more than just a way to pass a rainy afternoon. It is a tool for developing essential motor skills, a lesson in textures, and a spark for imaginative play. Plus, the end result is undeniably cute!
Whether you are making a whole flock to decorate a classroom or just one special sheep to hang on the fridge, we hope you enjoy the process. Remember, the goal isn’t perfection—it’s about the fun of creating something from scratch.