Gather all your leftover fabric scraps because we have some amazing Felt Crafts for Kids lined up! From adorable plushies to practical pencil toppers, there is a world of creativity waiting to be unlocked.
When children first enter the world of arts and crafts, they often start with basic materials like paper and cardboard. As their fine motor skills improve, they progress to pipe cleaners and pom-poms. But when they are ready for something tactile, durable, and colorful, it is time to introduce them to felt.
Felt is a magical material. It doesn’t fray, it comes in every color imaginable, and it can be glued or sewn, making it perfect for a wide range of ages. In this guide, we will explore tips for working with felt and provide detailed instructions for some of the cutest projects you can make at home.
Why We Love Crafting with Felt
Felt is versatile. Unlike woven fabrics that unravel when cut, felt is a non-woven textile made by matting, condensing, and pressing fibers together. This means you can cut it into any shape—no matter how intricate—and the edges will stay crisp and clean.
Top Tips for Success: Before we dive into the projects, here are a few pro-tips to make your crafting session smoother:
- Buy in Bulk: Buying multi-colored packs of felt is usually cheaper than buying individual sheets.
- Sharp Scissors are Key: Have a separate pair of scissors designated just for cutting felt. Paper dulls blades quickly, which can make cutting fabric difficult. Keep a smaller pair of embroidery scissors handy for detailed shapes.
- Thread Choice: Use embroidery floss when sewing. It is thicker and stronger than regular sewing thread, and it adds a nice pop of color.
- Quality Matters: If you want your crafts to last a long time (especially heirlooms or gifts), choose a good-quality wool blend felt over the cheaper synthetic acrylic versions. It feels softer and holds up better.
- Eco-Friendly Stuffing: For stuffing plushies, save your felt scraps! Snipping leftover felt into tiny pieces makes for excellent, dense stuffing, saving you from buying polyester fiberfill.
1. No-Sew Unicorn Pouch
Not all felt crafts require a needle and thread. This magical pouch is perfect for storing pencils, makeup, or secret treasures.
What You Need:
- White felt (two sheets).
- Pastel felt scraps (pink, purple, blue).
- Gold glitter foam or felt.
- Hot glue gun.
- Velcro dots.
How to Make It:
- Cut the Shape: Place two sheets of white felt on top of each other. Cut a large “U” shape or a rounded rectangle.
- Glue: Glue the edges of the two sheets together, leaving the top straight edge open. This forms the pocket.
- The Horn: Cut a triangle from the gold glitter material and glue it to the top center of the pouch.
- The Mane: Cut varied shapes of pastel felt—teardrops or swirls—and glue them around the horn to create a flowing mane.
- The Face: Cut black semicircles for eyes (with eyelashes!) and glue them to the front.
- Closure: Attach a velcro dot to the inside of the opening to keep it shut.
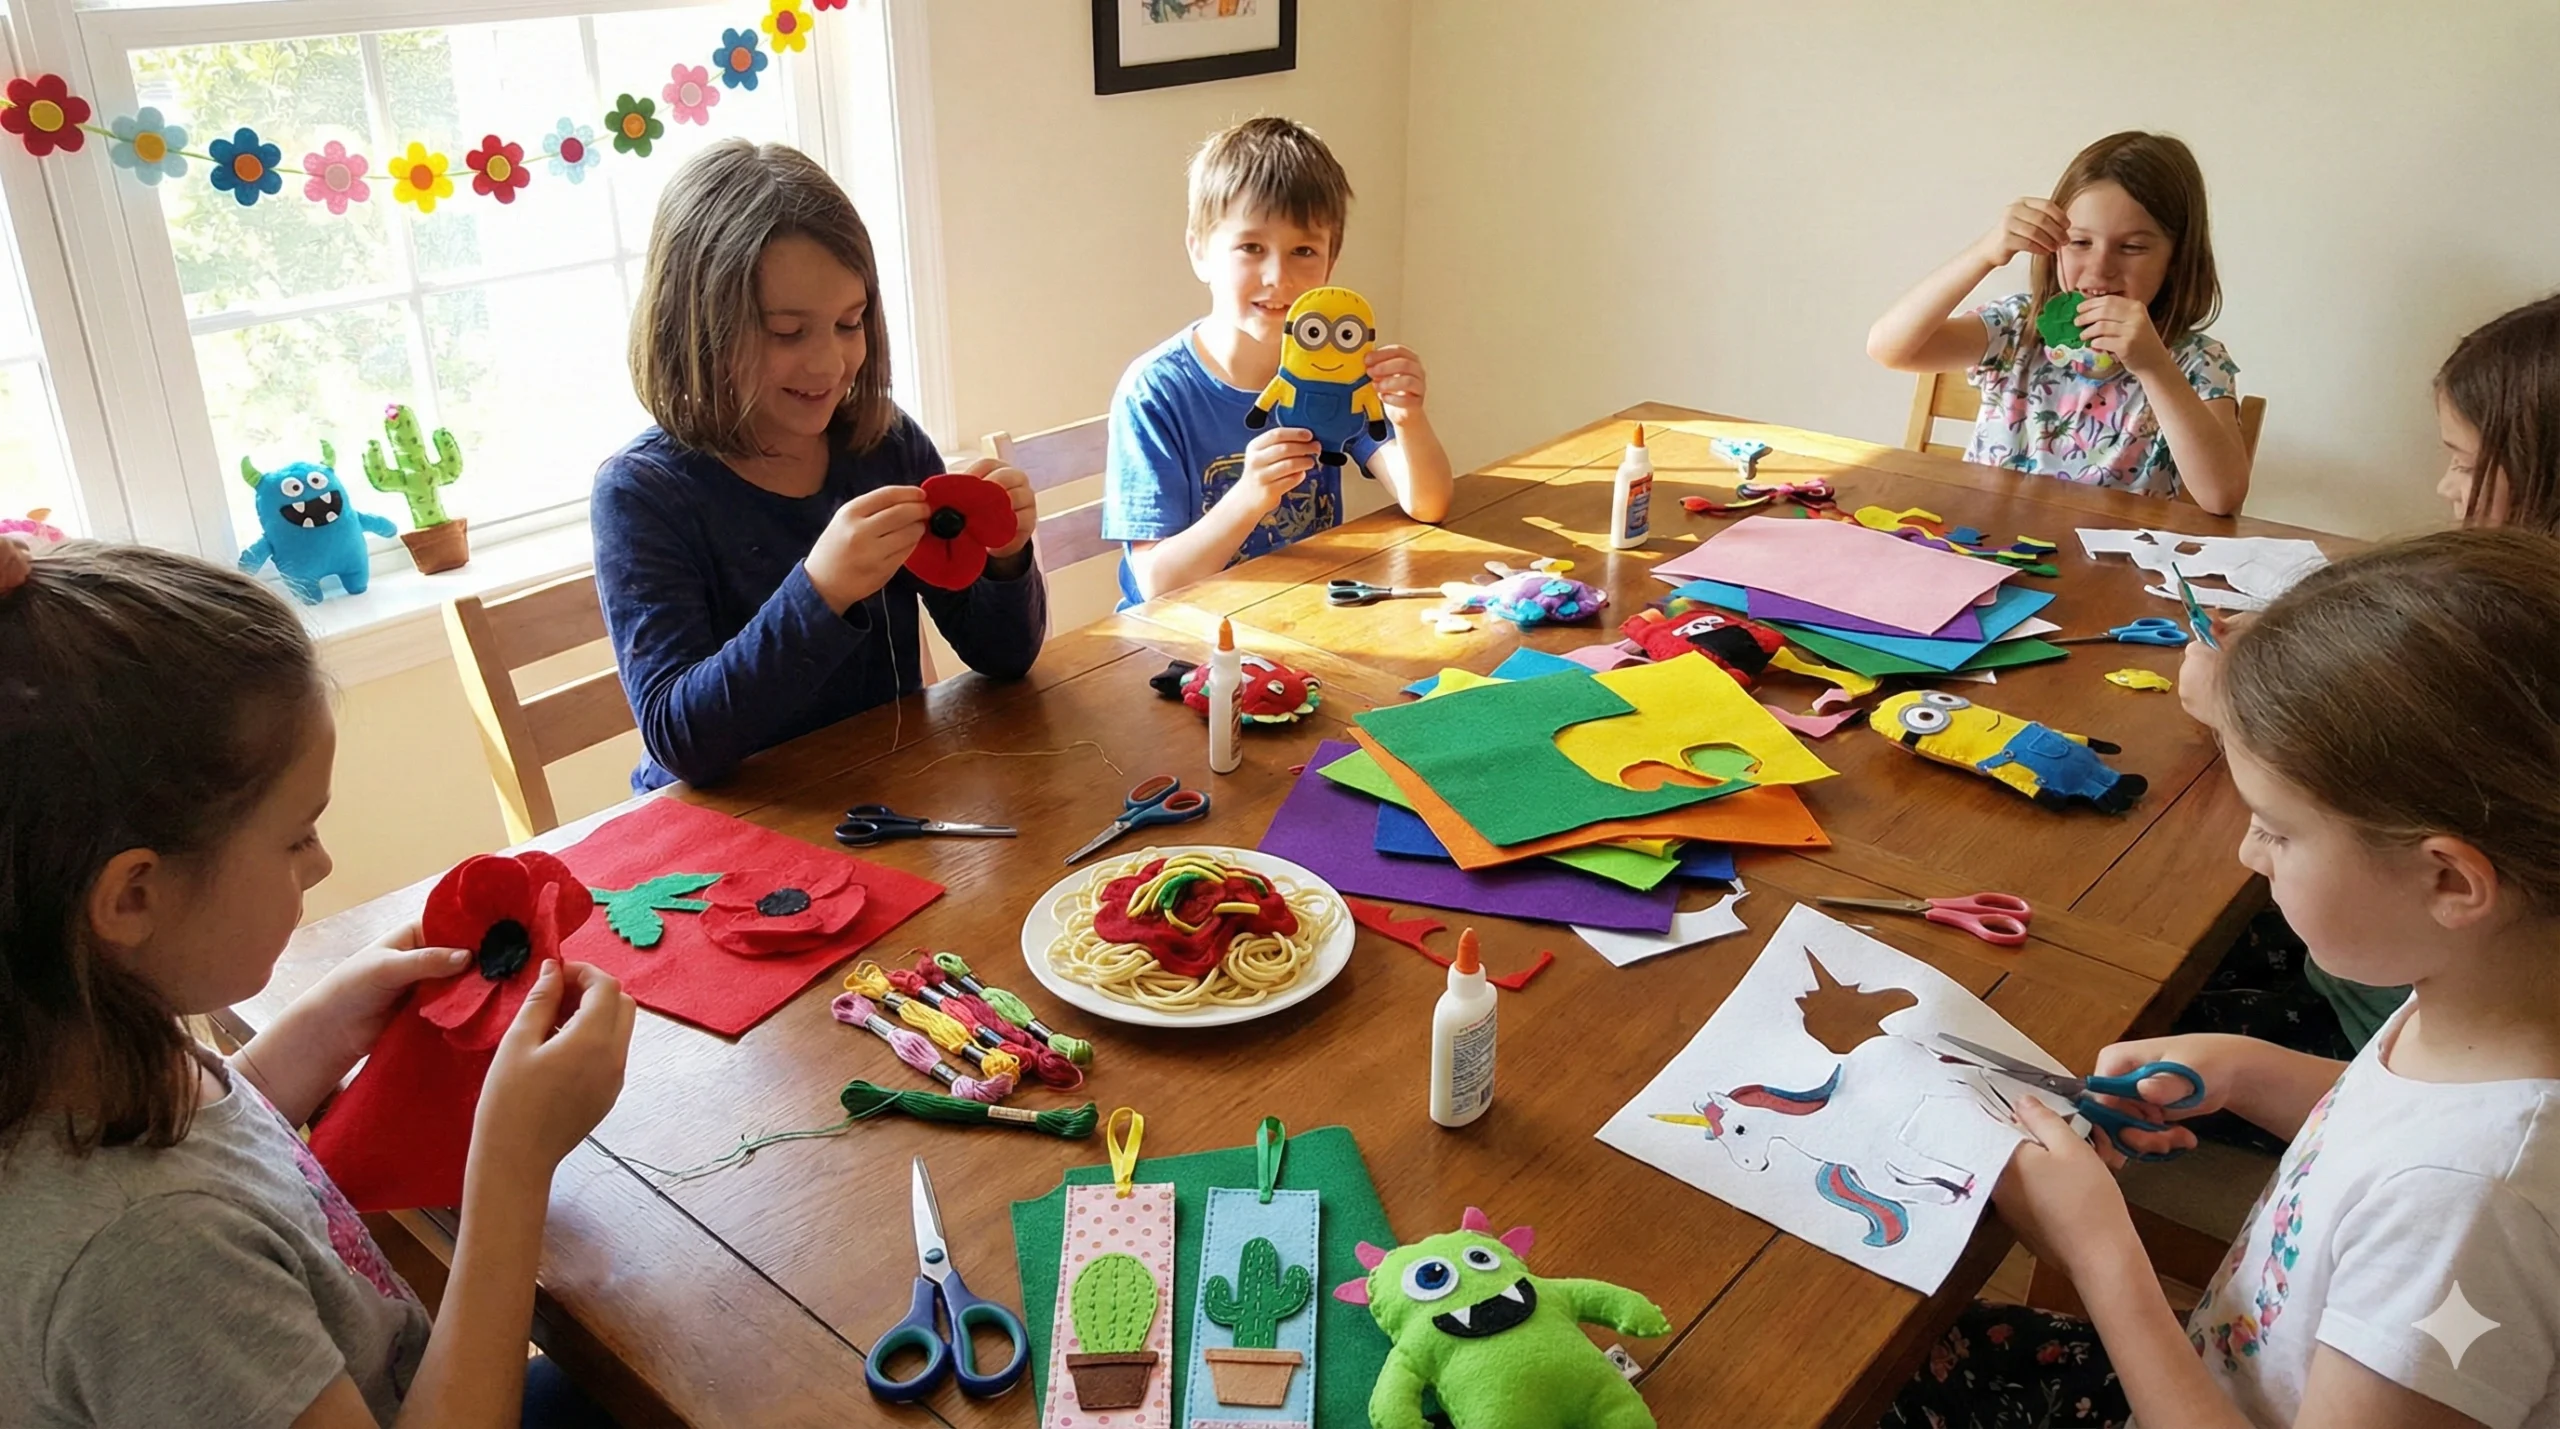
2. Pretend Play: Spaghetti and Meatballs
Pretend play food is one of the best things you can make with felt because it is soft, quiet, and durable. This mixed-media project is a hit with toddlers.
What You Need:
- Cream or yellow yarn (for spaghetti).
- Brown felt (for meatballs).
- Red felt (for sauce).
- Needle and thread.
How to Make It:
- The Pasta: Cut long strands of cream yarn. You don’t need to do anything else to them—they look just like cooked spaghetti!
- The Meatballs: Cut a circle of brown felt (about 3 inches wide). Run a running stitch around the edge with a needle and thread. Pull the thread slightly to cup the felt, stuff it with scraps, and pull tight to close it into a ball. Stitch it shut. Make 3 or 4 of these.
- The Sauce: Cut an irregular, wavy shape out of red felt. Place the yarn on a plate, top with the red “sauce” felt, and place your soft meatballs on top!
3. Remembrance Day Red Poppies
These gorgeous flowers are significant for Memorial Day or Remembrance Day, but they are beautiful enough to display year-round.
What You Need:
- Red felt.
- Black buttons or black felt circles.
- Green felt.
- Safety pin (optional).
How to Make It:
- The Petals: Cut four large heart shapes out of red felt.
- Assembly: Arrange the hearts in a circle so the points meet in the middle. Overlap them slightly. Glue or stitch them together at the center.
- The Center: Place a black button or a small black felt circle in the center and glue it down.
- The Leaves: Cut two simple leaf shapes from green felt and attach them to the back.
- Wear It: Glue a safety pin to the back to wear it as a brooch.
4. Cactus Garden Bookmarks
These prickly-looking (but soft-feeling) bookmarks make lovely gifts for teachers or book-loving friends.
What You Need:
- Green felt (various shades).
- Pink felt (for flowers).
- Large paper clips (jumbo size).
- Hot glue.
How to Make It:
- The Shape: Draw a cactus shape (like a pickle or a trident) on paper first. Use this template to cut two identical pieces of green felt.
- The Sandwich: Place a jumbo paper clip on one piece of felt, ensuring the loop sticks out the bottom. Apply glue generously and place the second felt piece on top, sandwiching the clip inside.
- Details: Use a fine-tip marker to draw “spines” or stitch small lines with white thread.
- The Bloom: Cut a tiny pink flower and glue it to the top of the cactus.
5. Motivation Minions
Everyone loves Minions! The best part about this craft is that you can customize the expressions to match your mood.
What You Need:
- Yellow, Blue, and Black felt.
- Googly eyes.
- Grey felt (for goggles).
- Glue.
How to Make It:
- The Body: Cut a pill shape (rounded rectangle) out of yellow felt.
- The Overalls: Cut a smaller shape from blue felt to look like pants with suspenders. Glue this onto the bottom half of the yellow body.
- The Goggles: Cut a strip of black felt for the strap. Cut grey circles for the goggles and glue them on top of the black strip. Place the googly eyes inside the grey circles.
- The Mouth: Cut a tiny black smile or frown and glue it on. You can make a whole army of these to use as finger puppets or decorations!
6. Lovely Ladybug Desk Companions
Homework isn’t always fun, but having a cute bug on your desk makes it better. These can be used as “worry stones” or tactile sensory toys.
What You Need:
- Red and Black felt.
- Stuffing.
- Black embroidery floss.
How to Make It:
- The Body: Cut two ovals from red felt.
- The Head: Cut a semi-circle of black felt and glue it to the top of one red oval.
- The Spots: Cut tiny circles of black felt and glue them onto the red body.
- Sewing: Place the second red oval underneath. Sew around the edges using a blanket stitch, leaving a small gap.
- Stuffing: Push stuffing into the gap until the ladybug is plump, then sew the gap closed.
7. Spring Flower Bouquet (That Never Dies)
Real flowers are lovely, but felt flowers last forever.
What You Need:
- Green pipe cleaners.
- Various colors of felt (purple, yellow, pink).
- Scissors.
How to Make It:
- The Strip: Cut a strip of colored felt about 2 inches wide and 10 inches long.
- The Fold: Fold the strip in half lengthwise. Glue the long edge or pin it.
- The Snip: Cut little slits along the folded edge, being careful not to cut all the way through. This creates loops.
- The Roll: Apply glue to the top of a green pipe cleaner. Start rolling the felt strip around the pipe cleaner. As you roll, the loops will fan out to look like a hyacinth or a mum.
- Secure: Glue the end of the strip down. You can add green felt leaves to the stem for extra detail.
8. Corner Heart Bookmarks
A great beginner project for kids just starting to sew.
What You Need:
- Felt squares.
- Needle and embroidery floss.
How to Make It:
- The Square: Cut a square of felt (about 3×3 inches).
- The Heart: Cut a heart shape that fits within that square size.
- The Corner: You actually don’t need the full square! Cut the square in half diagonally to make two triangles.
- Sewing: Place one triangle on top of another triangle. Sew the two short sides together, leaving the long diagonal side open.
- Decoration: Sew a heart or star onto the top triangle before sewing the two triangles together. Slip it over the corner of your page!
9. DIY Felt Monster Plushies
There are no rules here—the weirder, the better!
What You Need:
- Any color felt scraps.
- Stuffing.
- Buttons.
How to Make It:
- The Shape: Let the kids draw a monster shape (blob, square, star) on paper. Cut two pieces of felt in that shape.
- The Face: Decorate one side before sewing. Add one big eye, three small eyes, sharp teeth, or horns.
- Sew and Stuff: Sew the two body pieces together, stuff firmly, and close. These make great “scare-away” monsters for under the bed!
10. Felt “Paper” Chains
A reusable version of the classic paper chain countdown.
What You Need:
- Felt strips (1 inch x 6 inches).
- Velcro dots or snaps.
How to Make It:
- Prepare Strips: Cut many strips of different colored felt.
- Attachments: Attach a velcro dot to each end of the strip (one on the front side, one on the back side).
- Link: Loop the strip and attach the velcro. Loop the next strip through the first and close it.
- Reuse: Unlike paper chains which rip, these can be taken apart and rebuilt every holiday or birthday!
Conclusion
Felt is truly one of the most forgiving and fun materials for children to work with. It encourages tactile exploration and allows for mistakes—if you cut a shape wrong, it just becomes a different shape!
Whether you are making a no-sew unicorn pouch for school or stitching up a plate of spaghetti for the play kitchen, these crafts are sure to provide hours of screen-free entertainment. So, dive into your scrap bin and let your imagination run wild!