Mother’s Day has just passed, and Father’s Day is looming on the horizon next month. But right in the middle of these family milestones, I was surprised to learn about a unique holiday that celebrates something we all try to do better: eating healthy!
Did you know that May 21st is National Eat More Fruits and Vegetables Day?
Whatever the date, summer is the perfect time to celebrate nature’s candy. The markets are overflowing with watermelons, berries, and stone fruits, making it the ideal season to combine nutrition education with creativity.
Why Combine Fruit and Crafts?
“Don’t play with your food” is a rule we hear often, but when it comes to learning, playing is exactly what kids should do!
National Eat More Fruits and Vegetables Day was established to combat rising obesity rates and encourage healthy habits. However, simply telling a child “eat this because it’s healthy” rarely works.
Psychologists and nutritionists often suggest that exposure is key. When children interact with the shapes, colors, and textures of fruits through art, the food becomes familiar and less intimidating. A child who has just spent an hour painting a textured pineapple is far more likely to want to taste a real one.
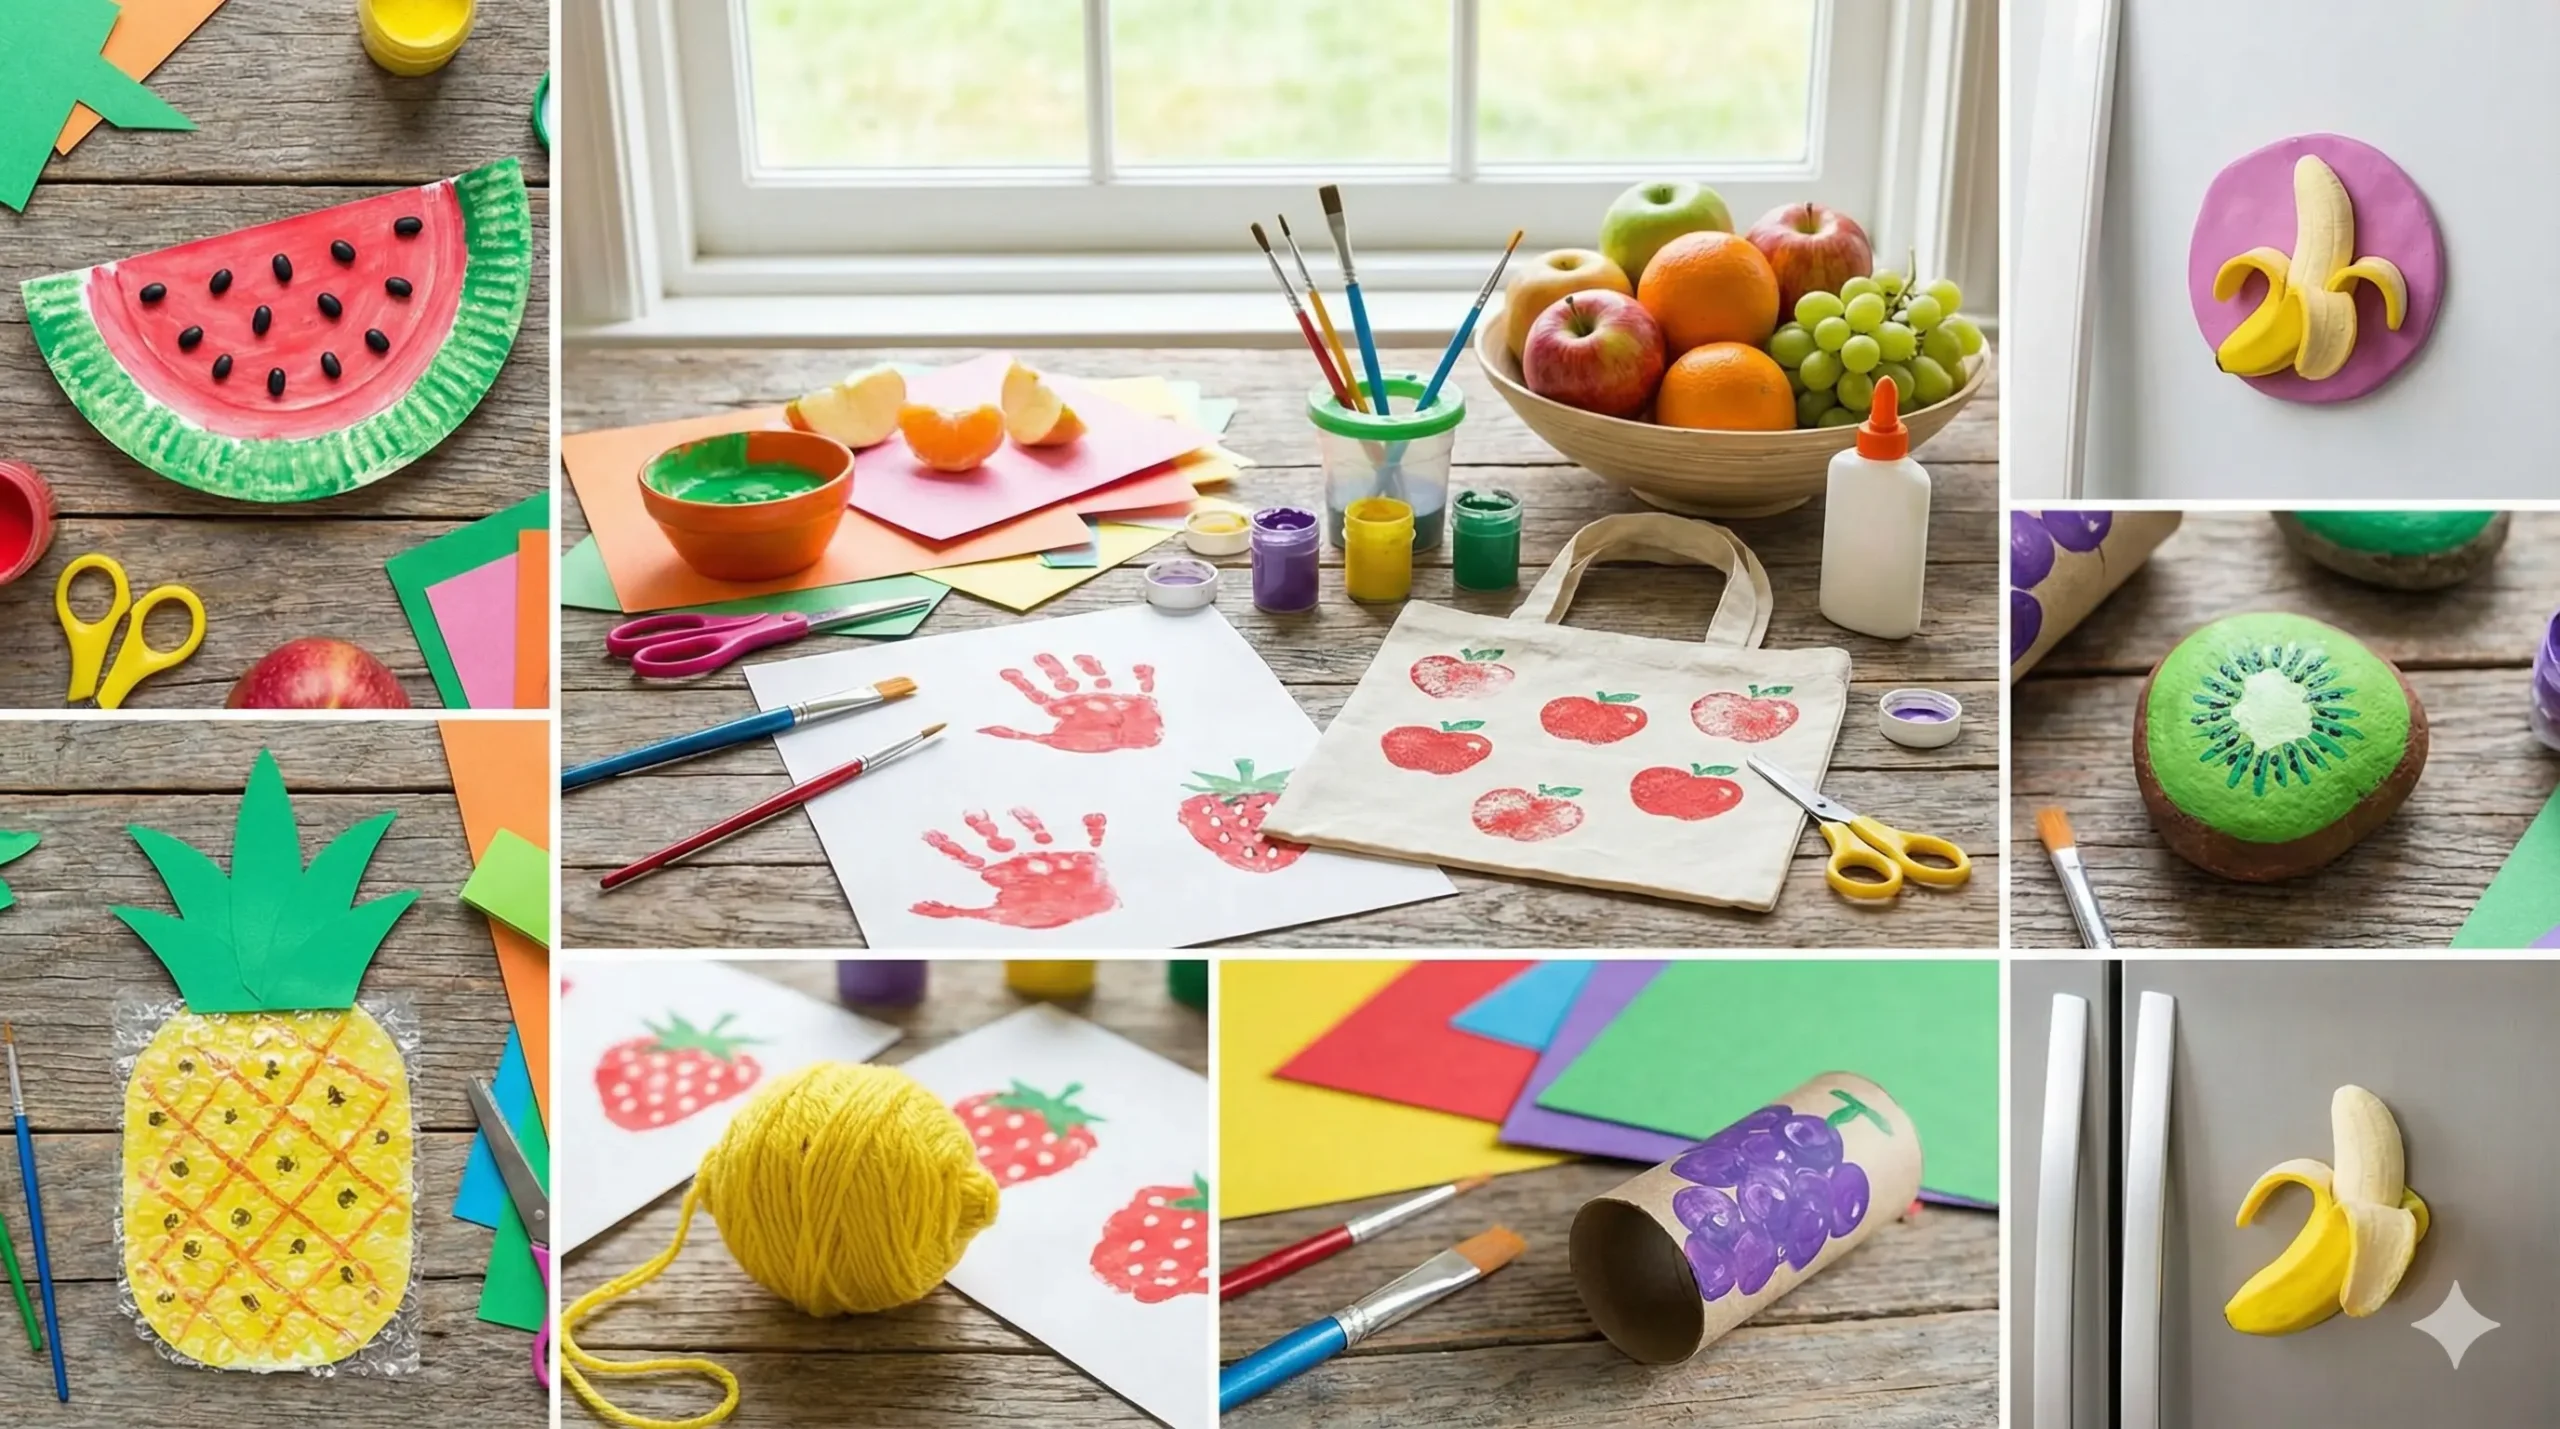
To help you celebrate, we have curated 20 fabulous fruit crafts for kids. These projects range from simple toddler activities to more advanced projects for older kids, using materials you likely already have at home.
1. Paper Plate Watermelon Slices
This is a classic summer craft that is impossible to mess up. It’s perfect for preschoolers practicing their cutting skills.
- What You Need: Paper plates, red and green paint, black beans or black buttons, glue.
- How to Make It: Paint the outer rim of the paper plate green and the center circle bright red. Once dry, cut the plate in half (or quarters). Have the child glue dry black beans onto the red section to represent the seeds. The sensory contrast between the smooth plate and the hard beans is great for little hands.
2. Bubble Wrap Printed Pineapples
Don’t throw away that packaging material! Bubble wrap creates a texture that looks exactly like the skin of a pineapple.
- What You Need: Bubble wrap, yellow and orange paint, green cardstock, white paper.
- How to Make It: Cut the bubble wrap into a large oval shape. Mix yellow paint with a tiny drop of orange. Paint the bubbles and flip the wrap over onto the white paper, pressing down firmly to stamp the texture. Cut spiky leaves out of green cardstock and glue them to the top.
3. Apple Stamping Art
This is a traditional art technique that teaches children about cross-sections and patterns.
- What You Need: Real apples (cut in half), red/green/yellow paint, heavy paper.
- How to Make It: Cut an apple vertically to show the classic shape, or horizontally to reveal the “star” pattern of the seeds. Dip the cut face into paint and stamp it onto paper. You can turn this into a counting game or use fabric paint to make a custom tote bag for grocery shopping!
4. Handprint Strawberries
A lovely keepsake craft that preserves the size of your little one’s hand.
- What You Need: Red paint, green paint, black marker.
- How to Make It: Paint the child’s palm red and their fingers green. Press their hand onto paper with the fingers pointing up (the fingers become the strawberry leaves). Once the paint dries, use a black marker to draw little seeds all over the red palm print.
5. Citrus Slice Coasters (Perler Beads)
For older children who love fine motor challenges, melting beads (Perler or Hama beads) are fantastic.
- What You Need: Round pegboard, yellow/orange/white beads, iron, parchment paper.
- How to Make It: Create a “wheel” pattern. Use white beads to create the rind and the inner segments (the spokes of the wheel). Fill the spaces with yellow (for lemon), orange (for orange), or green (for lime). Melt them with an iron (adult supervision required) to create durable drink coasters.
6. Rock Painting Kiwis
Turn smooth river stones into fuzzy kiwi fruit.
- What You Need: Oval stones, brown and bright green paint, black sharpie.
- How to Make It: Paint the entire rock a fuzzy light brown. Let it dry. Then, paint a smaller green oval on top, leaving a brown border. Add a white center and use the black marker to draw the tiny seeds radiating from the center. These make cute paperweights or garden decorations.
7. Toilet Roll Grape Bunch
An upcycling project that builds 3D structure.
- What You Need: 5-6 toilet paper rolls, purple paint, stapler or glue.
- How to Make It: Cut the toilet paper rolls into 2-inch rings. Paint them all purple (inside and out). Staple or glue the rings together in a pyramid shape (3 on top, 2 in middle, 1 on bottom). Attach a green paper leaf and stem to the top.
8. Button Cherry Collage
Great for color recognition and sorting.
- What You Need: Red buttons of various sizes, blue cardstock, green marker.
- How to Make It: Draw two stems connected at the top on the paper. Have the child glue red buttons at the bottom of the stems. Using different sizes of buttons adds depth and texture to the art piece.
9. Accordion Fold Paper Citrus
These make beautiful hanging decorations for a summer party.
- What You Need: Yellow, orange, or green paper strips.
- How to Make It: Take two long strips of paper and accordion fold them. Fan them out and glue the ends together to form a circle (rosette). Glue a smaller white circle in the center to look like the pith of the fruit.
10. Tissue Paper Crumple Apple
This is excellent for toddlers working on pincer grasp strength.
- What You Need: A paper plate or cardboard cutout of an apple, red tissue paper, glue.
- How to Make It: Cut the tissue paper into small squares. Have the child crumple them into tight little balls. Cover the apple cutout in glue and stick the red balls all over until it is fluffy and full.
11. Sponge Painted Bananas
Stencils make it easy for kids to get recognizable shapes.
- What You Need: Kitchen sponge, yellow paint, black paper, banana stencil (cut from cardboard).
- How to Make It: Cut a banana shape out of the center of a piece of cardboard to create a negative stencil. Place it over the black paper. Dip the sponge in yellow paint and dab it over the opening. Lift the cardboard to reveal a perfect, textured banana.
12. 3D Paper Pears
A lesson in geometry and shapes.
- What You Need: Green paper, scissors, glue.
- How to Make It: Cut 4-5 identical pear shapes. Fold them all in half vertically. Glue the back of the right half of one pear to the back of the left half of the next pear. Continue until the circle is closed. The pear will stand up on its own!
13. Coffee Filter Watermelon Suncatchers
Science meets art in this diffusion project.
- What You Need: Round coffee filters, washable markers (red and green), spray bottle with water.
- How to Make It: Color the center of the filter red and the outer edge green. It doesn’t need to be perfect. Spray the filter with water and watch the colors bleed and blend together. Once dry, paint on black seeds. Tape to the window to let the sun shine through.
14. Clay Fruit Magnets
A functional craft that you can use on the fridge.
- What You Need: Air-dry clay, paints, small magnets, strong glue.
- How to Make It: Sculpt small fruits—tiny oranges, bananas, or grapes—out of clay. Let them dry for 24 hours. Paint them in bright colors and seal with varnish. Glue a magnet to the back to hold up your grocery list.
15. Yarn Wrapped Lemons
Wrapping is a rhythmic, calming activity for kids.
- What You Need: Cardboard cut into a lemon shape (football shape), bright yellow yarn, tape.
- How to Make It: Tape the end of the yarn to the back of the cardboard. Have the child wrap the yarn around and around the shape until the cardboard is completely hidden. Tuck the end in. This creates a soft, textured lemon.
16. Paper Strip Oranges
This helps children understand how 2D strips can make a 3D sphere.
- What You Need: Orange paper cut into strips, two brad pins (split pins).
- How to Make It: Stack 8 strips of paper. Punch a hole through the stack at the top and bottom. Insert a brad pin through both ends. Fan the strips out to form a sphere shape. Add a green leaf on top.
17. Felt Fruit Keychains
An introduction to sewing for kids aged 8+.
- What You Need: Colorful felt squares, embroidery floss, plastic needle, stuffing.
- How to Make It: Cut two identical fruit shapes (like a strawberry). Sew around the edge using a running stitch, leaving a small gap. Stuff with cotton batting, then sew the gap closed. Attach a keyring loop.
18. Origami Strawberries
Paper folding enhances spatial reasoning.
- What You Need: Red origami paper (square), green marker.
- How to Make It: Use a simple “cup fold” technique to create the tapered bottom of the strawberry. Fold the top corners down to round the shape. Color the top green for leaves and draw seeds.
19. Popsicle Stick Apple Cores
A cute, rustic-looking craft.
- What You Need: 4 Popsicle sticks, red and green paint, black marker.
- How to Make It: Paint three sticks: the top and bottom tips red, and the middle plain wood color (to look like an eaten apple). Glue them together side-by-side. Paint the fourth stick green and glue it to the back as the stem. Draw seeds in the middle section.
20. Fingerprint Raspberry Bush
Messy fun for the little ones!
- What You Need: Blue or green paper, brown marker, pink/red paint.
- How to Make It: Draw a twiggy bush with the brown marker. Have the child dip their fingertip into pink paint and press it in clusters on the branches to look like bumpy raspberries.
Conclusion: Sweet Summer Fun
Whether you are a parent looking to fill a rainy afternoon or a teacher planning a nutrition unit, these 20 fabulous fruit crafts offer a wonderful way to engage children.
By celebrating Eat More Fruits and Vegetables Day, we aren’t just making pretty pictures; we are starting a conversation about health, fueling little bodies, and sparking imaginations.
So, grab your glue sticks, peel a real orange for a snack, and get crafting!