If you have a Barbie doll or a Barbie lover at home, you know the magic these iconic figures hold. I was absolutely crazy about Barbie dolls as a little girl—to the extent that I still have my old collection tucked away safely! I am admittedly possessive about it, having collected various sets and accessories over the years. I still remember the pleading and cajoling I had to do to get my parents to buy me the latest “Dreamhouse” or fashion set.
Looking back, I wish I had realized sooner that I didn’t have to wait for a store-bought toy to expand my Barbie world. I could have just made whatever I wanted!
Well, better late than never. In the world of DIY, creativity knows no bounds. Making your own Barbie accessories is not only cheaper than buying plastic sets, but it is also sustainable and offers a wonderful bonding opportunity for parents and kids. With Barbie Day coming up on March 9, there is no better time to get crafty.
Here are 20 Amazing DIY Barbie Crafts that turn everyday household trash into miniature treasure.
The Traveler Collection: Bags & Luggage
Barbie is a girl on the go. Whether she is jet-setting to Paris or heading to the office, she needs the right gear. These crafts focus on upcycling packaging materials.
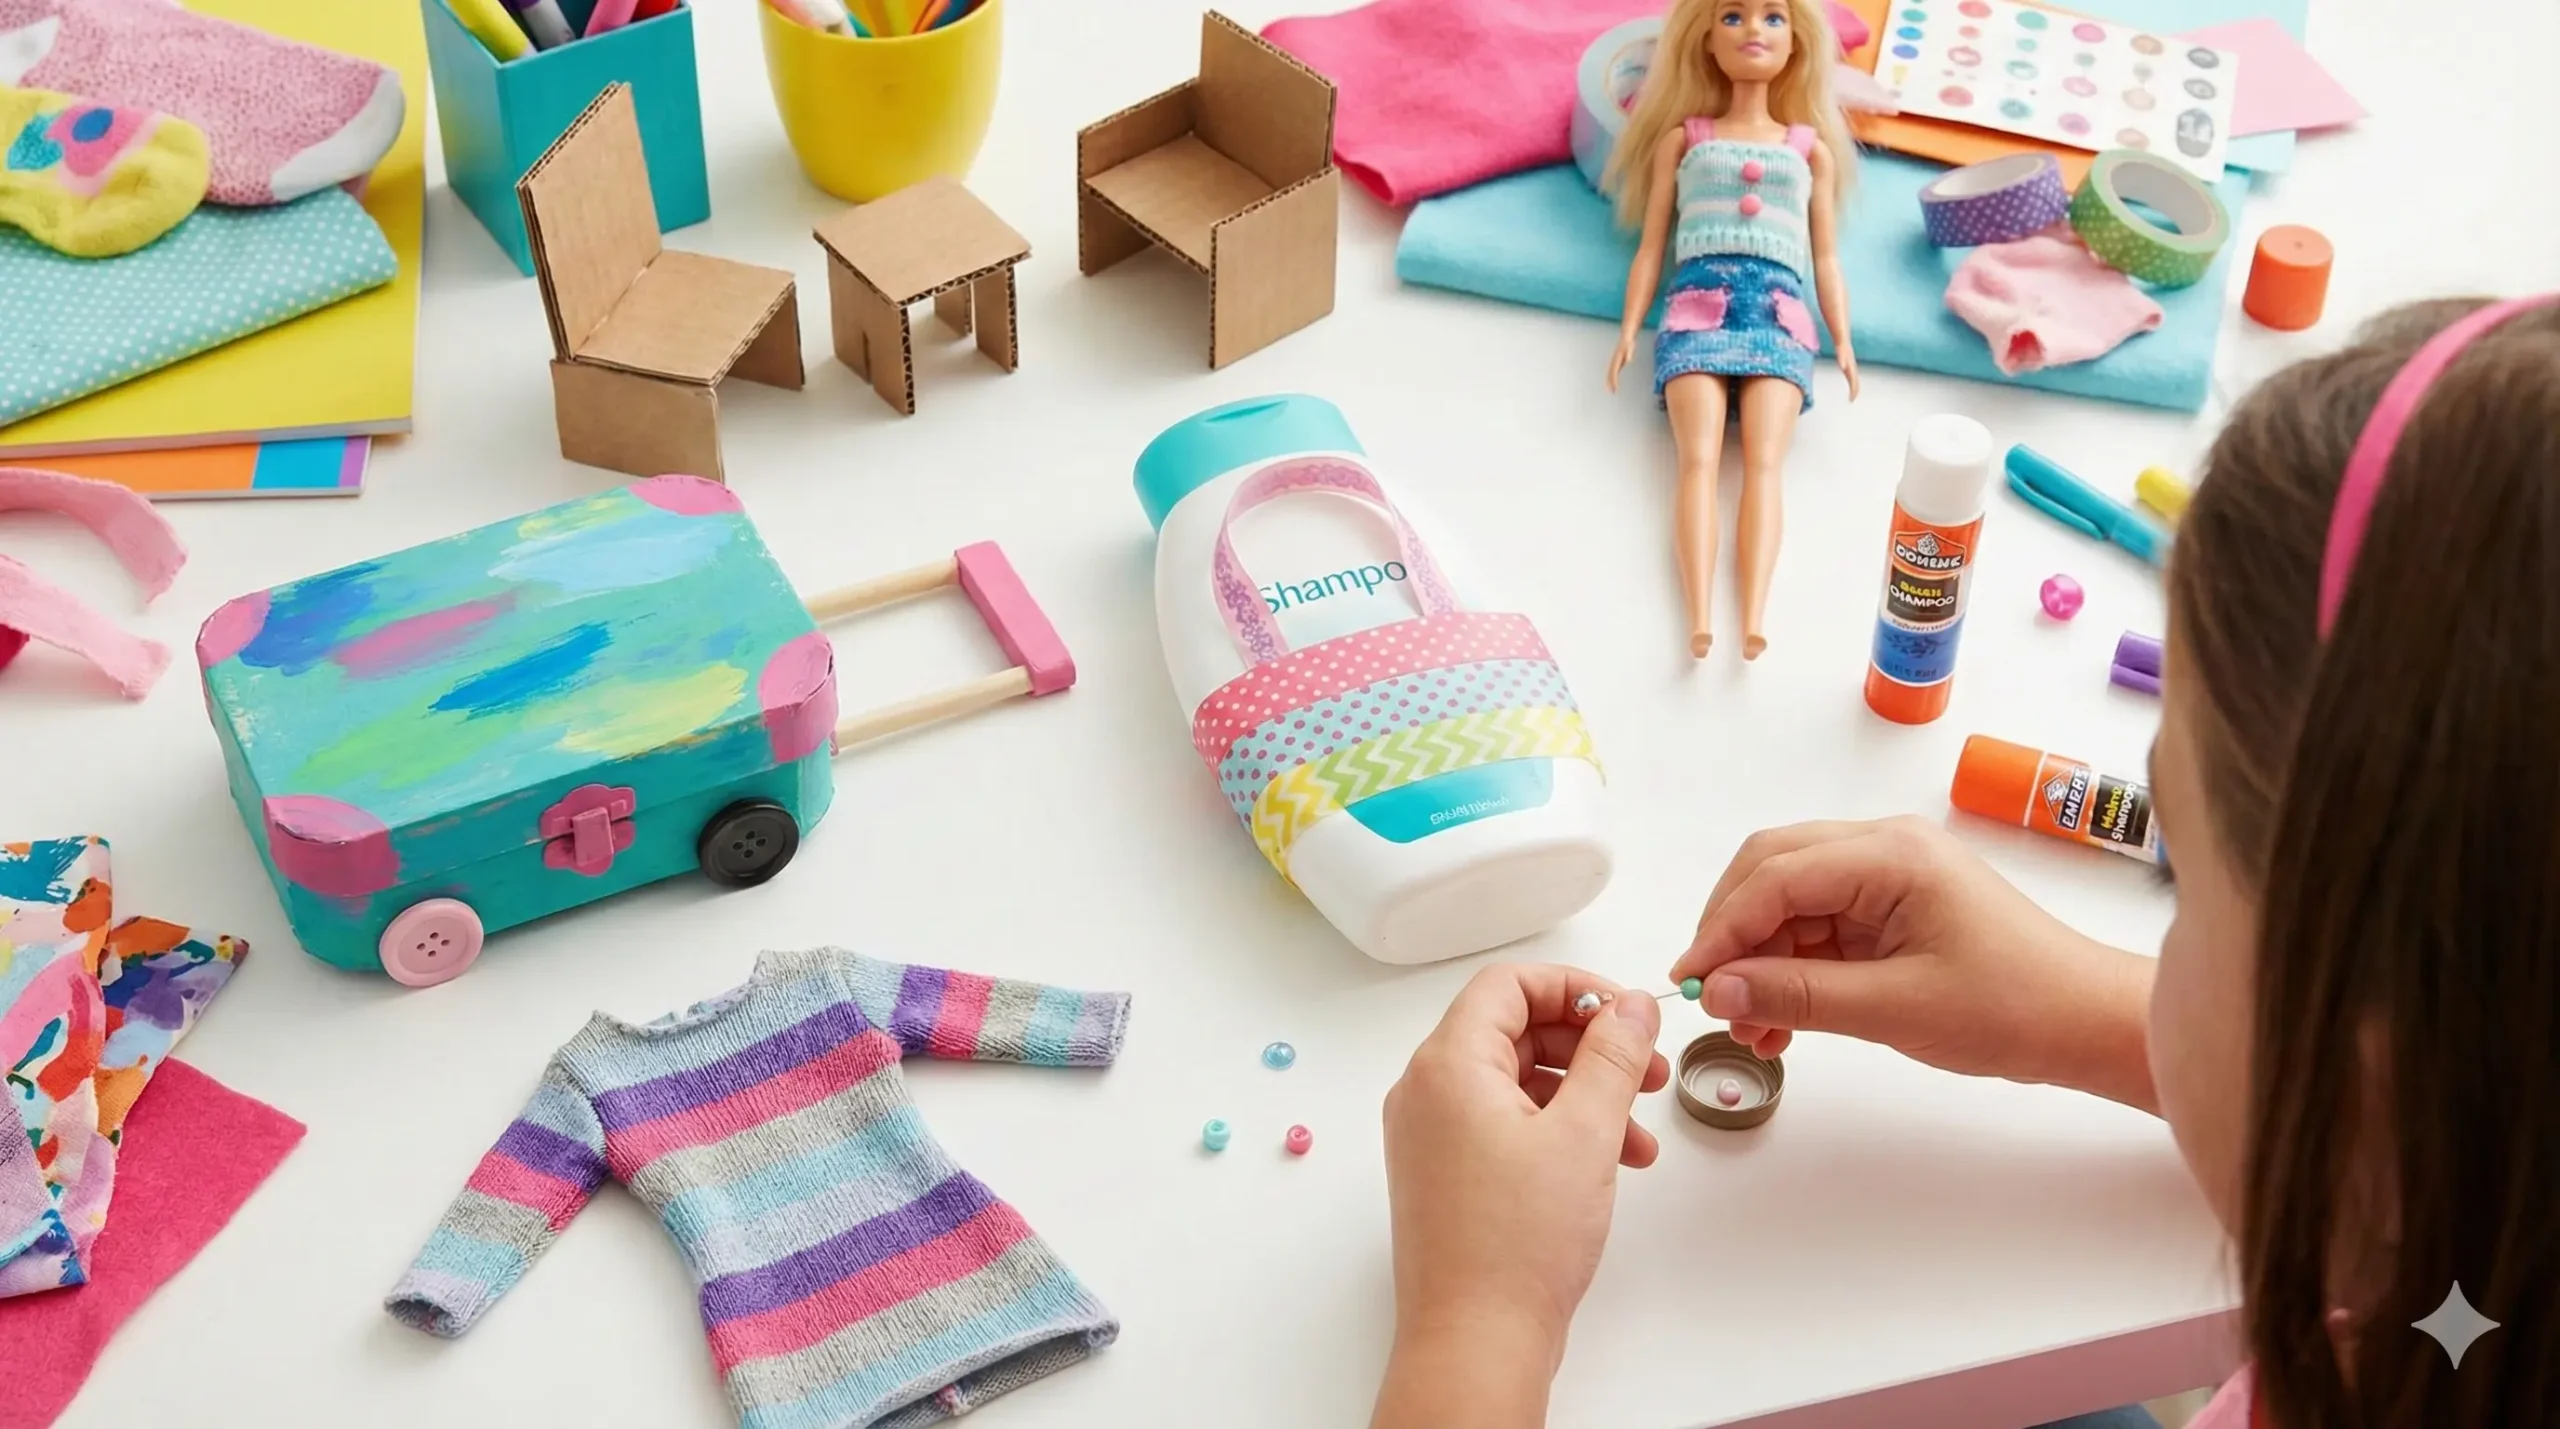
1. The Shampoo Bottle Tote Bag
Barbie sets often come with cute purses, but they are usually solid plastic and can’t hold anything. This DIY solves that.
- What you need: An empty travel-sized shampoo bottle, washi tape, pipe cleaners, scissors.
- How to do it: Thoroughly clean the bottle. Cut off the top half (ask an adult for help as the plastic can be sharp). Cover the rough edge with colorful washi tape. Poke two holes on either side and thread a pipe cleaner through to create handles. Now Barbie has a sturdy grocery tote!
2. The Soapbox Suitcase
Why restrict Barbie to a handbag when she can have a rolling suitcase?
- What you need: A small travel soap box (or a rectangular mint tin), buttons, glue, and a pipe cleaner.
- How to do it: Stand the soapbox vertically. Glue two small black buttons to the bottom corners to act as wheels. Bend a pipe cleaner into a “U” shape and glue it to the top back of the box to create a retractable handle. You can even stick a tiny travel sticker on the front!
3. The Matchbox Vintage Luggage
For those who love the vintage aesthetic, matchboxes make perfect retro trunks.
- What you need: Empty matchboxes, brown construction paper (or felt), a fine-tip black marker.
- How to do it: Wrap the matchbox sleeve in brown paper to look like leather. Draw “straps” and “buckles” with the black marker. The best part? The drawer still slides out, so Barbie can actually pack her tiny shoes inside.
4. The Leather Briefcase
When Barbie goes to work, she means business.
- What you need: A scrap of faux leather (from an old purse or wallet), velcro dots.
- How to do it: Cut a long rectangle of leather. Fold it in thirds like a letter. Add a velcro dot to keep the flap closed. Glue a small strip of leather on top for a handle. It’s perfect for holding miniature “documents.”
The Fashion Studio: DIY Clothing Hacks
You don’t need to know how to sew to expand Barbie’s wardrobe.
5. The Balloon Swimsuit
This is the easiest hack in the book.
- The Hack: Take a standard latex balloon. Cut off the neck (the rolled part) and a small sliver from the bottom curve. Step Barbie into it. The balloon hugs her figure perfectly, creating a waterproof, strapless swimsuit.
6. The Missing Sock Sweater Dress
Do you have a pile of socks that lost their partners?
- The Hack: Use a patterned sock. Cut off the toe section (this becomes a beanie hat). The tube part of the sock becomes a tube dress. Cut two small slits on the sides for armholes. It’s a cozy winter look that takes seconds to make.
7. Pipe Cleaner Headbands
- The Hack: Take a sparkly pipe cleaner and bend it into a “U” shape to fit Barbie’s head. Twist the ends into spirals or shapes like cat ears. It adds instant flair to any outfit.
8. The Ribbon Belt
Sometimes a dress just needs a cinch.
- The Hack: Use a thin satin ribbon and a small jump ring (from jewelry making). Thread the ribbon through the ring to create a functional belt that elevates a simple outfit.
Home & Furniture: Decorating the Dreamhouse
Furniture sets are expensive. Cardboard and creativity are free.
9. The Sponge Bed
Mattresses are essential for a good night’s sleep.
- What you need: New kitchen sponges, fabric scraps.
- How to do it: Glue two sponges together side-by-side to make a double bed, or use one for a single. Wrap them in a pretty fabric scrap “sheet” and secure it with hot glue on the bottom. It’s soft, squishy, and the perfect size.
10. The Popsicle Stick Bench
- What you need: Craft sticks (popsicle sticks) and wood glue.
- How to do it: Lay four sticks flat for the seat. Glue two sticks perpendicularly across the bottom to hold them together. Build a backrest the same way. Glue legs on using shorter cut sticks. Paint it white for a “farmhouse” look.
11. Tin Foil Wall Mirror
- What you need: Cardboard, aluminum foil, jewels.
- How to do it: Cut an oval from cardboard. Wrap it smoothly in aluminum foil (shiny side out). Glue this “mirror” onto a slightly larger piece of decorative cardstock. Glue tiny plastic gems around the border for a vanity mirror effect.
12. Yogurt Cup Chairs
- What you need: Clean, empty yogurt cups.
- How to do it: Cut out the front section of the cup, leaving the bottom (seat) and the back curve (backrest) intact. It creates a modern, “pod-style” chair that is very retro-chic.
13. Button Wall Clock
- What you need: A large coat button, a permanent marker.
- How to do it: Take a large, flat button. Draw clock hands and numbers on it with a fine-tip sharpie. Use a bit of poster putty to stick it to the wall of the dollhouse.
14. Paperclip Hangers
Barbie’s clothes need to be organized.
- The Hack: Take a large vinyl-coated paperclip. Twist it to form a hanger shape (a triangle with a hook on top). These fit perfectly on a dowel rod in a DIY closet.
The Tiny Details: Miniatures & Accessories
It’s the little things that make a dollhouse feel like a home.
15. Toothpaste Cap Cups
Next time you finish a tube of toothpaste, save the cap.
- The Hack: Wash the cap thoroughly. It is the perfect scale to be a tumbler or mug for Barbie. You can paint it or leave it as is.
16. Bead Perfume Bottles
- What you need: Assorted beads (different shapes), glue.
- How to do it: Glue a small clear bead onto a square bead, and top it with a tiny gold seed bead. It looks exactly like a high-end designer perfume bottle for her vanity.
17. Mini Books
- What you need: Paper, staples, cereal box cardboard.
- How to do it: Cut a small rectangle of cardboard for the cover. Cut several sheets of white paper slightly smaller. Fold them all in half and staple down the center spine. You can glue a magazine clipping to the front to make a “real” book cover.
18. Felt Rugs
- What you need: Fuzzy felt or faux fur fabric scraps.
- How to do it: Simply cut the fabric into organic shapes (like a bear skin rug) or perfect circles. It adds texture and warmth to the plastic floors of a dollhouse.
19. Bottle Cap Plates
- The Hack: Metal bottle caps (painted white) or the flat white caps from milk cartons make excellent dinner plates. You can use a permanent marker to draw “food” on them or use playdough.
20. The Cardboard Laptop
Barbie needs to check her emails too!
- How to do it: Cut a small piece of cardstock and fold it like a laptop. Draw a keyboard on the bottom half and glue a small picture (perhaps of a tropical destination) on the top half for the screen.
Why DIY is Better Than Buying
Creating these items offers benefits that go beyond saving money:
- Skill Building: Kids learn about engineering (how to make a chair stand), design (color coordination), and fine motor skills (cutting and gluing).
- Sustainability: We are teaching the next generation to reduce, reuse, and recycle. Using an old shampoo bottle instead of buying a plastic toy reduces waste.
- Customization: You can’t always buy a bedspread in your favorite color, but you can definitely make one!
Final Thoughts
Barbie has been a beloved toy for generations because she represents infinite possibility. By introducing DIY crafts into playtime, you are expanding that possibility even further. You aren’t just playing with a doll; you are becoming an architect, a fashion designer, and an artist.
So, this weekend, dump out the recycling bin, grab the glue gun (with adult supervision!), and start building a world as unique as your child’s imagination.